


A stock market dashboard allows users to track portfolio performance, analyze market trends, and assess the health of their investments in real-time. It has valuable applications for devs seeking to keep their users up-to-date with market trends, or build out a data analyst portfolio. Creating a market dashboard is also a great way to dip your toes into working with a finance API and financial data.
In this article, we’ll leverage React and APILayer’s Marketstack V2 free stock API to create a simple UI that displays end-of-day market data for requested stock tickers. Marketstack also provides up-to-the-minute stock data for real-time updates, but that use case is beyond the scope of this tutorial. We won’t be drawing any charts or graphs, but we recommend checking out React Stock Chart when you complete this guide, as a next step.
Table of Contents
Key Takeaways
A real-time stock market dashboard is a valuable tool for tracking and analyzing financial trends. The Marketstack API and Create React App make it easy to build a simple web app that allows a user to enter a list of ticker symbols for lookup.
Why a real-time stock market dashboard Is Essential for Investors
A Stock Market Dashboard is a powerful tool for investors and traders who want to track real-time market movements, analyze trends, and make data-driven decisions. By aggregating stock prices, company news, trading volumes, and historical data into one intuitive interface, a real-time stock market dashboard eliminates the need to browse multiple financial websites or use several disconnected tools. This makes it easier to stay updated on market changes and act quickly when needed.
How to Enhance Your Stock Market Dashboard with Key Features
To build a truly effective real-time stock market dashboard, it’s important to include features such as real-time stock price updates, interactive charts, market news feeds, and customizable watchlists. Integrating APIs like Marketstack enables your dashboard to deliver accurate and up-to-date stock data in both JSON and CSV formats. Additionally, implementing user-friendly features like search functionality, filtering by market sectors, and visual indicators for price trends will significantly enhance the usability of your Stock Market Dashboard and help users make smarter investment decisions.
Prerequisites
This tutorial assumes some familiarity with React and with APIs. To brush up on React prior to beginning, check out the docs. If you’re unfamiliar with what an API is, have a look at APILayer’s overview. You should also have yarn installed.
Yarn can be installed via the Homebrew package manager. You can check your version of Node using the following command:
$ node -v
Getting Started With Marketstack V2
APILayer recently released Marketstack V2, an update to their Marketstack stock market API that introduces new endpoints, enhanced market data, and improved performance.
Check out the Migration Guide if you need help migrating from V1.
Signing Up
The same membership options are available as with V1, so the free tier is still accessible, which will allow up to 100 free requests per month. We’ll use this tier to build and test our web app, so go ahead and sign up for a free account at https://marketstack.com/signup/free.
Get Your Free
Stock Data API Key!
Marketstack
Join thousands of developers using Marketstack for real-time market data!
Get Your Free API Key!No Credit Card Required*
100 Requests Free!
Once you’ve signed up, you’ll be taken to your dashboard, where you’ll find your API access key, statistics on monthly usage, and links to a quickstart guide and documentation. Make a note of your access key (we’ll need this later) and check out the documentation for an overview of the endpoints.
Endpoint
Marketplace V2 provides a complete API for stock data, including endpoints for End of Day, Splits, Intraday, Dividends and Tickers, as well as two endpoints that provide information about the API itself: Currencies and Timezones. These endpoints can be queried to find out which currencies and time zones the API supports.
Check out the Currency Layer API for additional currency-related endpoints.
For this app, we’ll be using the End-of-Day Data Endpoint. This endpoint provides EOD values for multiple stock tickers, with data updated every twenty-four hours. Provide the endpoint with a timestamp to receive data for a specific moment in time, or, for the most up-to-date data, use the eod/latest URL:
http://api.marketstack.com/v2/eod/latest
APILayer also provides an Intraday Data Endpoint, which returns more up-to-date stock data (refreshed every minute). For a truly “real-time stock market dashboard”, use this endpoint, along with a polling system, to pull fresh data every minute. A paid subscription is required to access this endpoint, so in the interest of keeping this tutorial free, we’ll use the End-of-Day data.
Pagination & Tickers
The endpoint returns paginated data, which breaks the response down into manageable chunks. Each additional call to retrieve the next page of data counts as an additional API call, so for this tutorial, we’ll only deal with the first page of results.
The endpoint considers every ticker you request a separate API call. So if you send a request for 50 tickers, you’ll have made 50 API calls. Again, since we’re only allowed 100 free API calls, we’ll limit our request to 5 tickers.

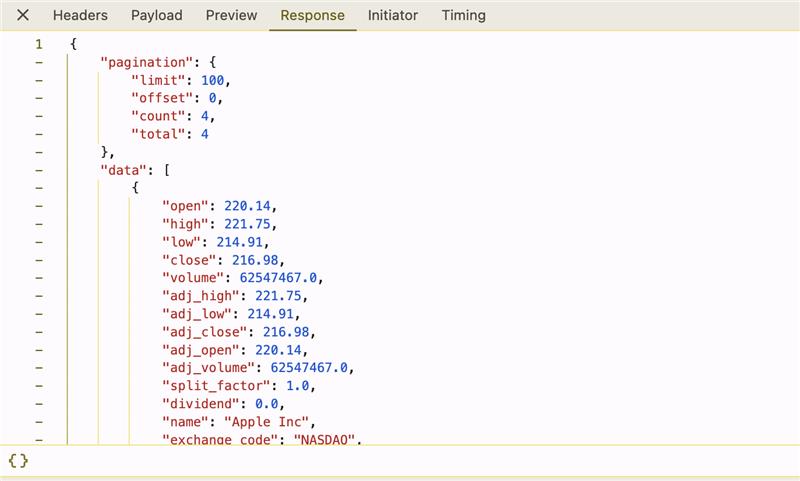
An example of a successful API response. Check out the End-of-Day Endpoint documentation for a thorough overview of the endpoint’s parameters.
Getting Started With React
We’ll use Create React App to get up and running quickly with a React web app. Check out the Create React App documentation for a detailed explanation of the framework—or follow the condensed quick start below.
Installing Dependencies
Make sure you have Node>=14 installed on your local dev machine. Then use yarn to install Create React App and create your app.
$ yarn create react-app marketplace-app
You won’t need to install or configure webpack or Babel—all this will be included. You’ll be walked through a quick setup wizard. Once you’ve finished, you can start the app by running:
					$ cd marketplace-app
$ yarn start
This will spin up the app at localhost: 3000. Head to the page in your browser to view the boilerplate.

Prepare Your src/App.js File and Test Hot Reloading
To keep things simple, we’ll work directly in the main component, App.js. Open the file in your preferred editor and remove everything between the two header tags. Save the file and go back to the browser to verify that the updates are propagating.
Querying the API
First, let’s retrieve our stock data from the API to make sure our requests go through and that we understand the shape of the response.
Retrieve Market Data
Import your access key and base URL to the top of the App.js file. Note that we’re adding our key directly to App.js for simplicity’s sake only: in a production app you should always put sensitive information like this in an environment file.
Write a function to make the request to the stock price API. Put the function call inside a useEffect hook to force the code to run when the component mounts. Don’t forget to catch and log any errors, and pass the empty dependency array to useEffect so that the function only runs once.
For more on using async functions with useEffect, check here.
					import { useEffect } from 'react';
const ACCESS_KEY = "YOUR ACCESS KEY";
const MARKETSTACK_URL = "http://api.marketstack.com/v2/eod/latest";
...
// inside component
 useEffect (() => {
   const retrieveMarketData = async () =>{
     const response = await fetch(MARKETSTACK_URL + `?access_key=${ACCESS_KEY}&symbols=AAPL,VZ,NTDOY,DIS,BA`);
     console.log(response.json())
   }
   retrieveMarketData().catch(console.error)
 },[])
We appended our access key to the URL as our first query param, and for now, we hardcoded a list of 5 tickers we want data for as a comma-separated list. Later, we’ll have the user input the 5 symbols they want to look up.
We logged the data to the console so we can take a look at it—once we’re sure it’s returning as expected, we’ll add this data to our state.
Examine the Data
The Marketstack API returns JSON data in the following shape:
					{
    "pagination": {
      "limit": 100,
      "offset": 0,
      "count": 100,
      "total": 9944
    },
    "data": [
      {
        "open": 228.46,
        "high": 229.52,
        "low": 227.3,
        "close": 227.79,
        "volume": 34025967.0,
        "adj_high": 229.52,
        "adj_low": 227.3,
        "adj_close": 227.79,
        "adj_open": 228.46,
        "adj_volume": 34025967.0,
        "split_factor": 1.0,
        "dividend": 0.0,
        "name": "Apple Inc",
        "exchange_code": "NASDAQ",
        "asset_type": "Stock",
        "price_currency": "usd",
        "symbol": "AAPL",
        "exchange": "XNAS",
        "date": "2024-09-27T00:00:00+0000"
        },
      [...]
    ]
}
We don’t need to display all this information to the user—we’ll just use a few fields: the name, high, low, and close values. We’ll build a simple component to display the current time, and then list our ticker names, with the high, low, and latest end-of-day values.
Process the Data
We need a function to iterate through our results array and format it into our expected shape. Let’s put this function into a services file. Create the file by running this command inside the project’s src folder:
$ touch services.js
Inside services.js, create the following helper function.
					export const formatMarketData = (json) => {
   return json.data.map(({name, high, low, close}) => {name, high, low, close});
}
This maps each object in the array down to the relevant fields. See Object Destructuring for an explanation of destructuring syntax.
Add the Data to Component State
Before we can display the stock data to the user, we need to add it to the component state. Create an array in state to hold the expected values, then update it with the array we’ll be showing to our user.
					import { useEffect, useState } from 'react'; // added useState
import { formatMarketData } from './services';
...
//inside component
 const [marketData, setMarketData] = useState([])


 useEffect (() => {
   const retrieveMarketData = async () =>{
     const response = await fetch(MARKETSTACK_URL + `?access_key=${ACCESS_KEY}&symbols=AAPL,VZ,NTDOY,DIS,BA`);
     const json = await response.json();
     const data = formatMarketData(json);
     setMarketData(data);
   }
   retrieveMarketData().catch(console.error)
 },[])
Rendering the UI
Now that we have our data, it’s time to display it. In the return function of the App component, add the following JSX.
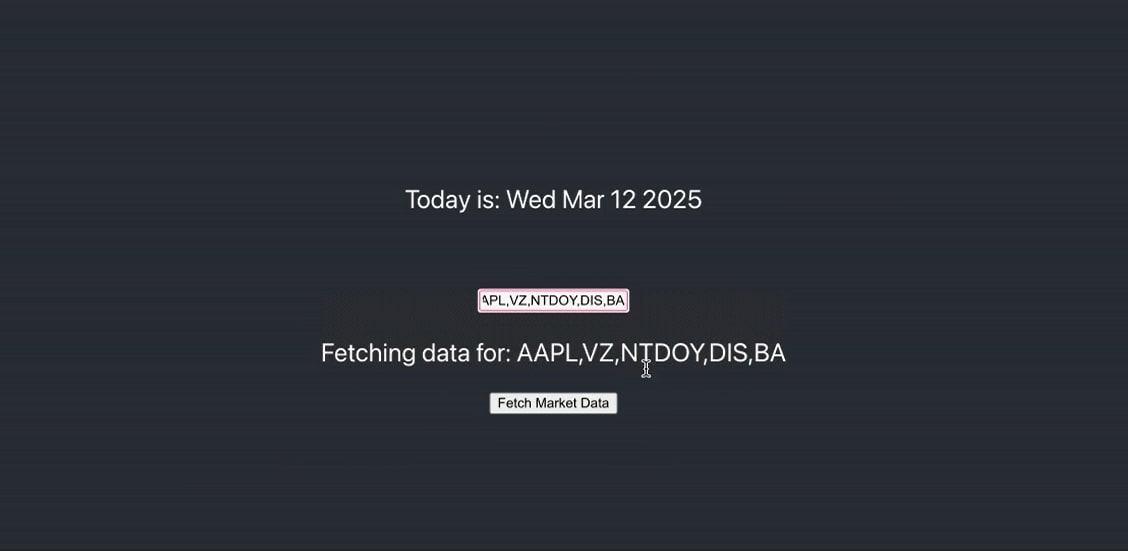
return (
Today is: {new Date().toDateString()}
{
marketData.map((item) => {
return (
-
Stock Name: {item.name}
Yesterday’s High: {item.high}
Yesterday’s Low: {item.low}
Closed at: {item.close}
)
})
}
);
Head to your browser to see the (very ugly because we haven’t styled it) list.
Accept User Input
Great! We’re rendering data from our stock API. Time to throw some CSS on there and call it good, right? Well, no, not if you want this app to actually be useful. For that, we need the user to tell us which stocks they want to see data for.
To capture this data, we’ll need a text input, and we’ll need to hold our user’s choices in state. We’ll give the user a button to push so they can decide when to query the API, and we’ll update our useEffect hook and fetch calls to accept the parameters that the user gives us.
Let’s start with the UI.
Build Input Fields
Underneath our list of stock data, let’s add a button and a text input. We’ll map the values of the text input to some new values in state, and we’ll move our retrieveMarketData call to run when the user pushes the button, rather than when the component mounts.
Tickers
First, let’s use a text input to collect our ticker symbols. Since the API expects stock symbols to be appended to the URL as a string of comma-separated values, this is what we’ll collect from the user. Ideally, we would have a dropdown list of stock symbols for the user to select from, so we could be sure what they’re choosing is valid input, but that’s beyond the scope of this tutorial.
Add the following below your unordered-list JSX:
Fetching data for: {tickers}
Create a value in state to hold the input, and an updateTickers function to update the state:
					 const [tickers, setTickers] = useState("");
...
 const updateTickers = (event) => {
   setTickers(event.target.value);
 }
Querying the API With User-Inputted Data
Now that we have tickers to query for, we need to append them to our base URL and let the user send the request to the API to retrieve the stock data. Let’s start by removing the API call from useEffect.
					 useEffect (() => {
   // move this into the component scope, and delete useEffect
   const retrieveMarketData = async () =>{
     const response = await fetch(MARKETSTACK_URL + `?access_key=${ACCESS_KEY}&symbols=AAPL,VZ,NTDOY,DIS,BA`);
     const json = response.json();
     const data = formatMarketData(json);
     setMarketData(data);
   }
   retrieveMarketData().catch(console.error)
 },[])
Next, we’ll pass our ticker data to the retrieveMarketData function, and attach that function to a button that the user can push to call it.
const retrieveMarketData = async () =>{
const response = await fetch(MARKETSTACK_URL + `?access_key=${ACCESS_KEY}&symbols=${tickers}`);
const json = response.json();
const data = formatMarketData(json);
setMarketData(data);
setTickers("");
}
...
//in JSX (below element)
In our retrieveMarketData function, we’re now grabbing the symbols parameter from the tickers that the user typed into our text input. We’re fetching data for those symbols, rendering it, then resetting the tickers state so it’s ready to accept 5 new symbols.
Catch Errors
If the user pushes the button without entering any tickers to look up, enters an invalid ticker value that the API doesn’tdoens’t recognize, or if something goes wrong with the network request, we want to alert the user that something has gone wrong. Let’s add one final piece of state and a new p element to catch and render errors.
					const [error, setError] = useState({})
...
 const retrieveMarketData = async () =>{
   try {
     const response = await fetch(MARKETSTACK_URL + `?access_key=${ACCESS_KEY}&symbols=${tickers}`);
     const json = await response.json();
     const data = formatMarketData(json);
     setMarketData(data);
     setTickers("");
   } catch(error) {
     console.error(error);
     setError(error)
   }
 }
...
// in JSX (below button)
{error.message}
Let’s go to the browser to see our app in action.

Next Steps
There are many ways in which this can be improved. The first, obviously, would be to apply some style beyond just rendering the error message in red.
Next, we could add a list of expected ticker values (either to validate what the user types into our text input, or to provide as a dropdown for the user to choose from.) This will prevent unnecessary calls with invalid lookup parameters from being made against the API.
We could write a function to check how many ticker values the user inputs, to ensure they don’t enter more than the allowed amount (right now, there is nothing preventing the user from inputting more than 5 values.) Finally, we could catch and process any errors that come back and provide the user with human-friendly error messages.
Marketstack: An API for Stock Data
This article should have given you a good jumping-off point to explore all the capabilities of the Marketstack finance API on your own. Take your project to the next level with React Stock Chart, or explore one of APILayer’s other APIs to add additional functionality to your app.
Frequently Asked Questions
What is the best API for a real-time stock market dashboard?
Marketstack V2 is one of the best APIs for stock data, offering reliable end-of-day and real-time stock market data with a free tier that includes 100 API calls per month. It provides comprehensive market data from global exchanges with easy integration for developers. This makes Marketstack ideal for building a Stock Market Dashboard that aggregates and visualizes stock information effectively.
How do I get free stock API access?
You can get free stock API access by signing up for Marketstack’s free tier at https://marketstack.com/signup/free. The free plan includes 100 API calls per month and access to end-of-day stock data, making it perfect for building stock market dashboards and learning projects.
The free plan includes comprehensive stock data, splits, dividends, and volume information – no credit card required.
Can I build a real-time stock market dashboard with React?
Yes! You can build a real-time stock market dashboard with React using Marketstack API. While this tutorial demonstrates end-of-day data (free tier), you can create near real-time dashboards by:
- Using Marketstack’s intraday data (paid plans) for minute-level updates
- Implementing polling mechanisms to refresh data automatically
- Adding WebSocket connections for live updates
- Using React hooks for efficient state management
This allows you to build a fully functional Stock Market Dashboard tailored to your needs.
Is the API real-time, and how often is the data updated?
Marketstack offers different update frequencies:
- End-of-day data: Updated once daily after market close (free tier)
- Intraday data: Updated every minute during market hours (paid plans)
- Real-time data: Available through premium plans with sub-second updates
The free plan provides reliable end-of-day data, while paid subscriptions unlock real-time capabilities for professional applications.
What is the most reliable API for financial data integration?
Marketstack V2 is among the most reliable financial APIs, offering:
- Extensive data about 2700+ Stock Exchanges Info, 30000+ Stock tickers from more than 50 countries, as well as 750 + Stock Market indexes, information about timezones, currencies, and more.
- 99.9% uptime SLA
- Data from 70+ global exchanges
- Comprehensive error handling and status codes
- Detailed documentation and SDKs
Enterprise customers rely on Marketstack for mission-critical financial applications due to its robust infrastructure and data accuracy.
How do I get the API of the stock market in JavaScript?
To integrate stock market data in JavaScript, use the fetch() API with a stock data provider like Marketstack:
					const ACCESS_KEY = "your_api_key";
const response = await fetch(`https://api.marketstack.com/v2/eod/latest?access_key=${ACCESS_KEY}&symbols=AAPL,MSFT`);
const data = await response.json();
					import requests
response = requests.get('https://api.marketstack.com/v2/eod/latest?access_key=YOUR_KEY&symbols=AAPL')
data = response.json()