Real-time flight updates are crucial for users who need reliable travel data to plan their trips. In this article we’ll show you how to build a web app that uses real-time flight data from the Aviationstack API to send email notifications to users when details about their scheduled flight change.
Table of Contents
Key Takeaways
- A real-time flight notification app allows a user to see up-to-the-minute information about their scheduled flight.
- Using React Native and the Aviationstack API, we can build an app that sends an email to a user if there is a delay, gate change, or other update for their flight.
- The Mailboxlayer API validates the user’s email before we send notifications to it, to ensure it’s correct.
- Nodemailer sends the email from our server.
Prerequisites
This tutorial assumes familiarity with React and APIs. To brush up on React, check the docs. If you’re unfamiliar with what an API is, have a look at APILayer’s overview.
You should also have Node, which can be installed using the Homebrew package manager. You can check your version of Node using the following command:
$ node -v
Step One: Getting Started With Aviationstack, Mailboxlayer, and Gmail SMTP
We’ll be using the Aviationstack API to pull flight data and the Mailboxlayer API to validate email addresses. Both of these are offered freely by APILayer. Requests to both APIs are made using a straightforward HTTP GET method, and responses are returned in JSON. We’ll use Gmail to help send an email from our server.
Sign Up
Aviationstack and Mailboxlayer have a free tier that allows up to 100 free requests per month. You can sign up for a free Aviationstack account at https://aviationstack.com/signup/free and for Mailboxlayer at https://mailboxlayer.com/signup/free.
Once you’ve signed up, you can access your dashboard, where you’ll find your API access key, statistics on monthly usage, and links to a quickstart guide and documentation. Make a note of your access key and look at the documentation for Aviationstack and your dashboard for Mailboxlayer for an overview of the endpoints.
Endpoints
Mailboxlayer has only one endpoint, which accepts requests with an email for validation appended to the URL querystring (along with your access key.) The base URL is:
https://apilayer.net/api/check
Aviationstack provides an endpoint called Flights that returns information about all current and immediately scheduled global flights. The base URLfor this endpoint can be found in the Aviationstack Documentation:
Hitting that endpoint will return a paginated list of all flights currently in-air or scheduled to depart. You can provide additional optional parameters to filter the results by data, airport, airline, flight number, IATA code, etc.
Parameters
Because we’re interested in getting up-to-date information about a particular flight, we’ll be using the flight_iata parameter, which filters the result set down to a single IATA code (for example GL635 for a flight on Greenland Airlines) and the dep_iata, which further filters the result set down to a flight departing from a particular airport.
Using these two parameters, we can get information about a single flight. Parameters are appended to the URL as a querystring, like so:
GET https://api.aviationstack.com/v1/flights?access_key=YOUR-ACCESS-KEY&flight_iata=UA1004&dep_iata=LGA
This will return the UA1004 flight departing today from La Guardia. Always make sure to append your access key to authorize all requests, and check out the documentation for a list of other parameters.
Note: this app requires a user to know their departing airport’s 3-letter IATA code. This is a limitation of the free API plan. Basic Plans and higher can use the “Airports” endpoint to search for IATA codes by inputting an airport name.
Gmail Settings
Sign up for a Gmail account if you don’t already have one. Next, follow these steps to get set up to allow your Node server to send emails from your Gmail account:
- Enable 2-step verification on your Google account.
- Go to: https://myaccount.google.com/apppasswords
- Generate an App Password for “Mail”.
- Use that 16-character password instead of your real Gmail password in your code.
Step Two: Getting Started With the Web App
We’ll use Node to build our backend and Create React App to develop the client side. CRA is a framework that helps you quickly build and test React projects. The React docs have an excellent Get Started guide.
Create Folder & Install Frontend Dependencies
Check that you have Node>=14 installed on your dev machine, and npm version 5.2 or higher. Create a top-level directory for your project. Then cd into the folder and use npx to install Create React App and spin up the client side application in one command:
					$ mkdir flight-notifier
$ cd flight-notifier
$ npx create-react-app client
You’ll be walked through a quick setup wizard. Once you’ve finished, you can start the app by running:
					$ cd client
$ npm start
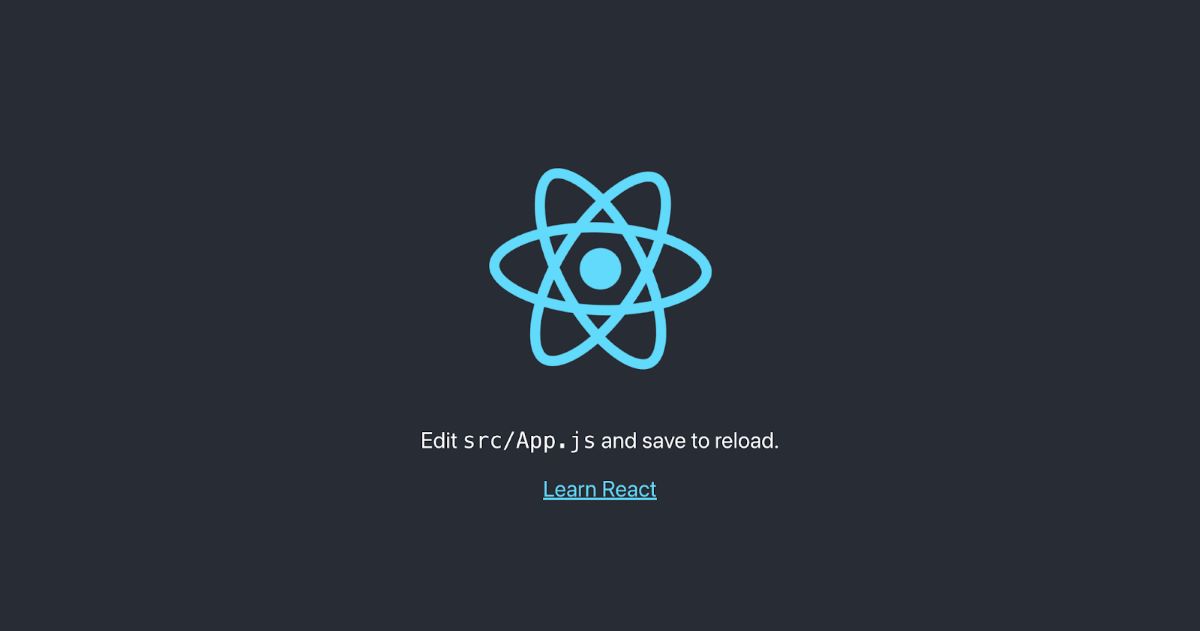
Head to localhost:3000 in your browser. You should see the following boilerplate, provided by Create React App:
Delete everything between the two <header> tags in App.js. Return to the app in the browser and you should now see a blank gray page. This tells you that the changes are propagating through the dev server. And you now have a blank app, ready to build your own UI.
Install Backend Dependencies
Navigate back to the root directory and create a folder next to the client folder for your server. Then navigate into it and install the backend dependencies.
We’ll use Node and Express to get a server up and running quickly. We’ll be using a native Node module called FS to write the user’s flight data to a file on the server, Nodemailer to send email, and Dotenv for our environment variables.
					$ cd ../
$ mkdir server
$ cd server && npm init
$ npm install -s express nodemailer dotenv
Step Three: Building the UI
Because the focus of this flight tracker tutorial is the notification system, we won’t spend too much time on the app’s UI. We just need some basic things so the user can input their email, flight number and departing airport IATA code.
Update the App.js component in your frontend React code to the following:
					import './App.css';
import { useState } from 'react';


function App() {


  const [userEmail, setUserEmail] = useState("");
  const [flightNumber, setFlightNumber] = useState("");
  const [airportCode, setAirportCode] = useState("");


  const onPressNotifyMe = () => {
   //TODO
  }


 return (
   <div className="App">
     <header className="App-header">
      <h1><span class="ez-toc-section" id="Welcome"></span>Welcome!<span class="ez-toc-section-end"></span></h1>
      <h2><span class="ez-toc-section" id="Sign_up_for_email_notifications_about_your_flight"></span>Sign up for email notifications about your flight<span class="ez-toc-section-end"></span></h2>
      <div className='flight-data'>
       <input
         type="text"
         placeholder='Your flight number'
         value={flightNumber}
         onChange={(e) => setFlightNumber(e.target.value)}
         className='input'
       />
       <input
         type="text"
         placeholder='Your airport IATA code'
         value={airportCode}
         onChange={(e) => setAirportCode(e.target.value)}
         className='input'
       />
      </div>
      <input
        type="text"
        placeholder='your@email.address'
        value={userEmail}
        onChange={(e) => setUserEmail(e.target.value)}
        className='input'
      />
      <button onClick={onPressNotifyMe} className='button'>Notify Me</button>
     </header>
   </div>
 );
}


export default App;
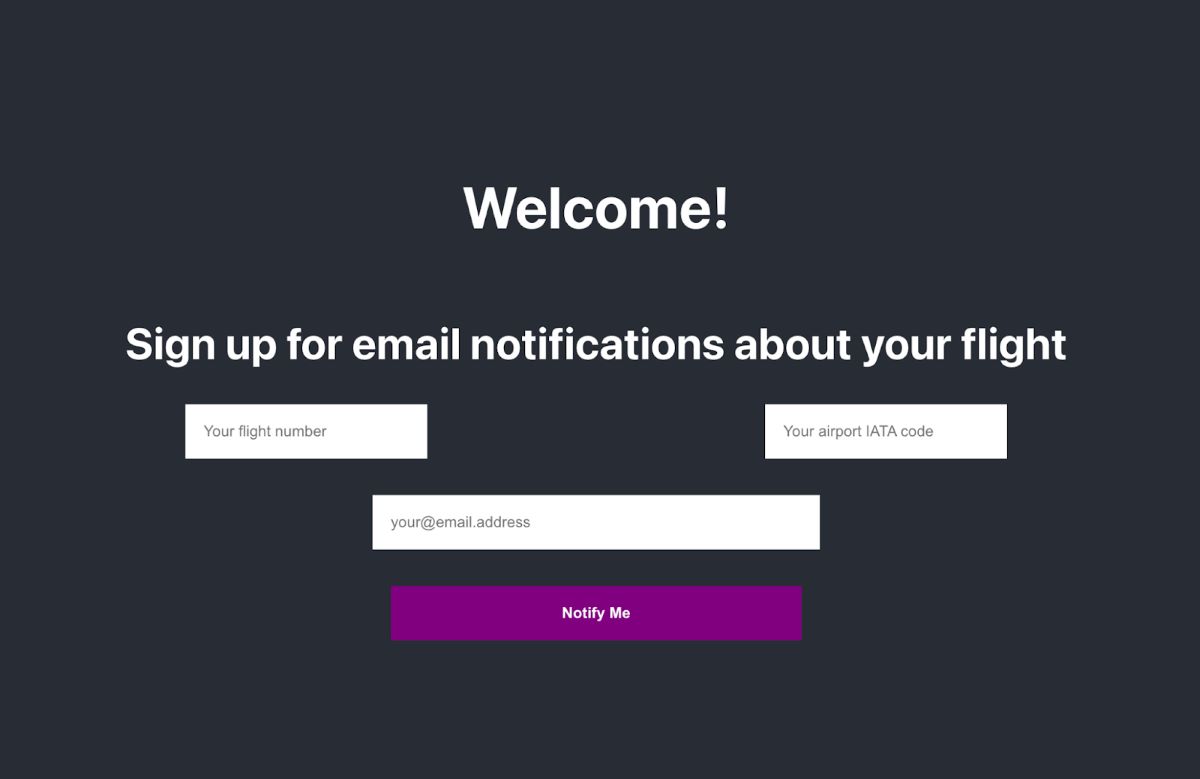
This gives us two text inputs that we can use to grab the flight number and airport from the user, an input for them to enter their email address, and a “Notify Me” button the user can hit once they input all that, to let us know they want notifications.
The onPressNotifyMe function will handle sending all the user’s data to our backend, which will forward it to the other APIs and handle the logic of sending the email notification. So let’s come back and write this function once we finish setting up our backend.
We’ve added some basic styling in App.css (which you can view at the end of this tutorial) but won’t style or add much more to the UI than this. Take a look at the app in the browser, and you should see the following:
Step Four: Setting up the Server
Instead of sending requests directly from our frontend to the Aviationstack and Mailboxlayer APIs, we’re instead going to proxy them through our own server, which will send the requests to the APIs for us and handle the responses.
This allows us to keep API keys secret, and handle all the logic of email validation, and detecting changes to the flight plan on the backend, rather than in the client.
Spinning Up Express
Navigate into your server folder and create a file called index.js. This is where we’ll write the code for our server and set up the route that will handle requests from our frontend. Inside index.js add the following:
					const express = require("express");
const PORT = process.env.PORT || 3000;
const app = express();


app.listen(PORT, () => {
console.log(`Server listening on ${PORT}`);
});
Then, in your terminal, run
$ node index.js
to start the server. You’ll see “Server listening on 3000” print out in your terminal console.
Create the Route
Add the following code to the index file to create the route that accepts requests from our frontend:
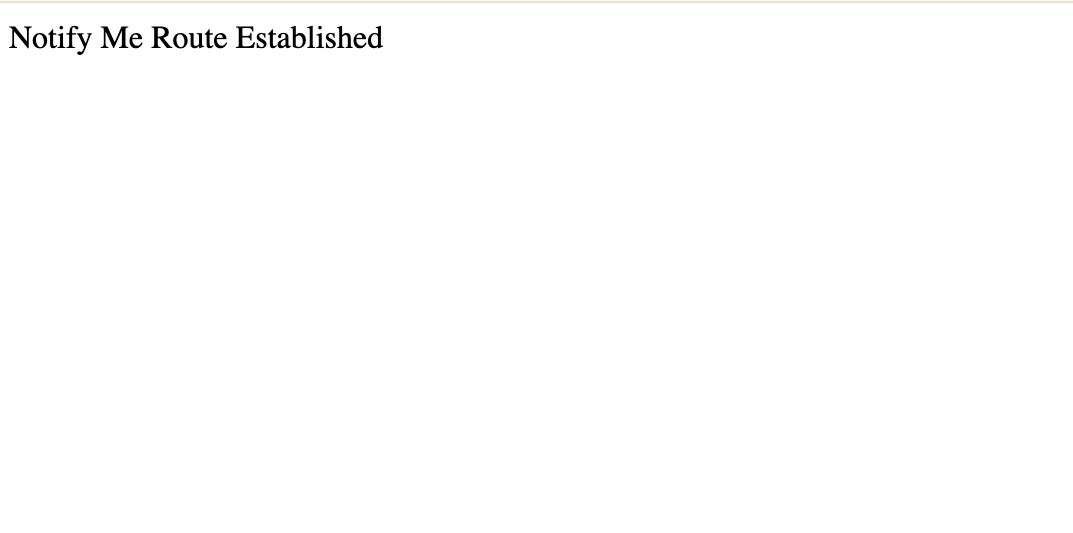
					app.get('/notify', async(req, res) => {
   res.send("Notify Me Route Established")
})
All this does at the moment is send back a string that says Notify Me Route Established. If restart the server and navigate in your browser to localhost:3000/notify, you should see the following:
Next, we’ll write the code that handles the incoming request. That code will:
- Pull the user’s email from the request object
- Send the email to Mailboxlayer for validation
- If the email is valid, pull the user’s flight number & IATA code from the request object
- Send the flight number & IATA code to Aviationstack to get the flight data
- Check the flight data to see if there is any change from previously pulled data
- If there is a change, send an email to the user with the new information
- Cache the flight data for next time
Finally, we’ll put all that logic into a polling function that runs every five minutes after the first initial pull.
Step Five: Validating the Email
Express gives us a handy req (request) object as the first argument to the function that we used to create our route. From this object, we can pull querystring parameters or data that was sent along with the request, like the user’s email address.
Pull the email from the request object
Add the following code to grab the email:
					app.get('/notify', async (req, res) => {
   const email = req.body.email;
Send the email to the Mailboxlayer API
Construct the URL using the email for validation and your access key as query parameters. Note that we have two access keys (one for Mailboxlayer and one for Aviationstack) and we’ve imported our ACCESS_KEY and BASE_URL from an environment file. In a production app, you should keep all secrets like API keys in an gitignored environment file so they don’t get committed to an online repository.
					require('dotenv').config();
const MAILBOXLAYER_API_KEY = process.env.MAILBOXLAYER_KEY;
const MAILBOXLAYER_API_URL = process.env.MAILBOXLAYER_URL;


...


   const response = await fetch(MAILBOXLAYER_API_URL + `?access_key=${MAILBOXLAYER_API_KEY}&email=${email}`);
Handle the API response
When the response comes back, we’ll use the format_valid value from the Mailboxlayer JSON response object to determine if the email is valid. Here’s an example of the response we get back from Mailboxlayer:
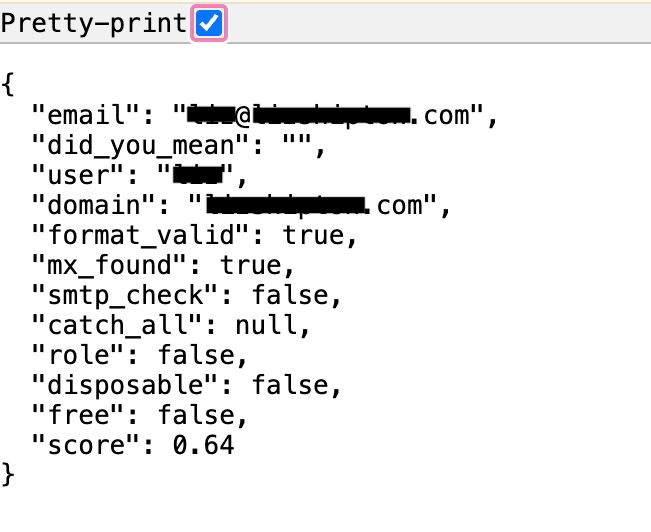
Note: you should include all of these values for a robust validity check, but for the purposes of this tutorial, we’ll just use format_valid.
Here’s the full email validation code, including to check the email validity:
					app.get('/notify', async (req, res) => {
   const userEmail = req.query.userEmail;
   const response = await fetch(MAILBOXLAYER_API_URL + `?access_key=${MAILBOXLAYER_API_KEY}&email=${userEmail}`);
   const json = await response.json();
   const isValid = json.format_valid;
})
Step Six: Retrieving the Flight Data
If the email is valid, we’ll grab the user’s flight number and IATA code and write a function that hits the Aviationstack endpoint, using those values to query for the most recent information for that flight.
Get the flight info
Pull the information off the Express request object like we did for the email:
					  if (isValid) {
       const {flightNumber, airportCode} = req.query;
   }
Construct the API URL
Use this data and your API access key (remember, it’s a different key than you used for Mailboxlayer) to build the URL, then use fetch to make the request:
const response = await fetch(AVIATIONSTACK_API_URL + `?access_key=${AVIATIONSTACK_API_KEY}&flight_iata=${flightNumber}&dep_iata=${airportCode}`);
Handle the API response
This time, when the response comes back, we want to check it against our cached data to see if there are any changes to the user’s flight. The first time this request is made, we won’t have any cached data, but after we cache that first response, we’ll then need to check and update that cache with every subsequent response.
We’re using a Node module called FS (FileSystem) to “cache” the data, which just persists the JSON information to a file in the filesystem. Technically, this isn’t actually “caching” in the sense that, say, a Redis cache is a cache, but the word cache is fun to say, so…let’s call it a cache.
Add the following code to read the cache, and then update it with the fresh data:
					const flightDataFile = '/tmp/flight-data.json'


...


  if (isValid) {
   const {flightNumber, airportCode, userEmail} = req.query;
   const response = await fetch(AVIATIONSTACK_API_URL + `?access_key=${AVIATIONSTACK_API_KEY}&flight_iata=${flightNumber}&dep_iata=${airportCode}`);
   const json = await response.json();
   try {
       if (fs.existsSync(flightDataFile)) {
           const cache = JSON.parse(fs.readFileSync(flightDataFile));
	    // check the cache (see next step)
       }
         const toWrite = JSON.stringify(json.data[0]);
         fs.writeFileSync(flightDataFile, toWrite);
         res.send("Signed user up for email notifications")
       } catch(err) {
           res.status(500).send(err)
       }
   }
Step Seven: Checking the Cache
To find out if there is a difference between the saved data and the new data, we need to know what the API response looks like. For now, we’re just going to pull the departure gate and delay information from this response. Those will be the things we alert the user about if they change.
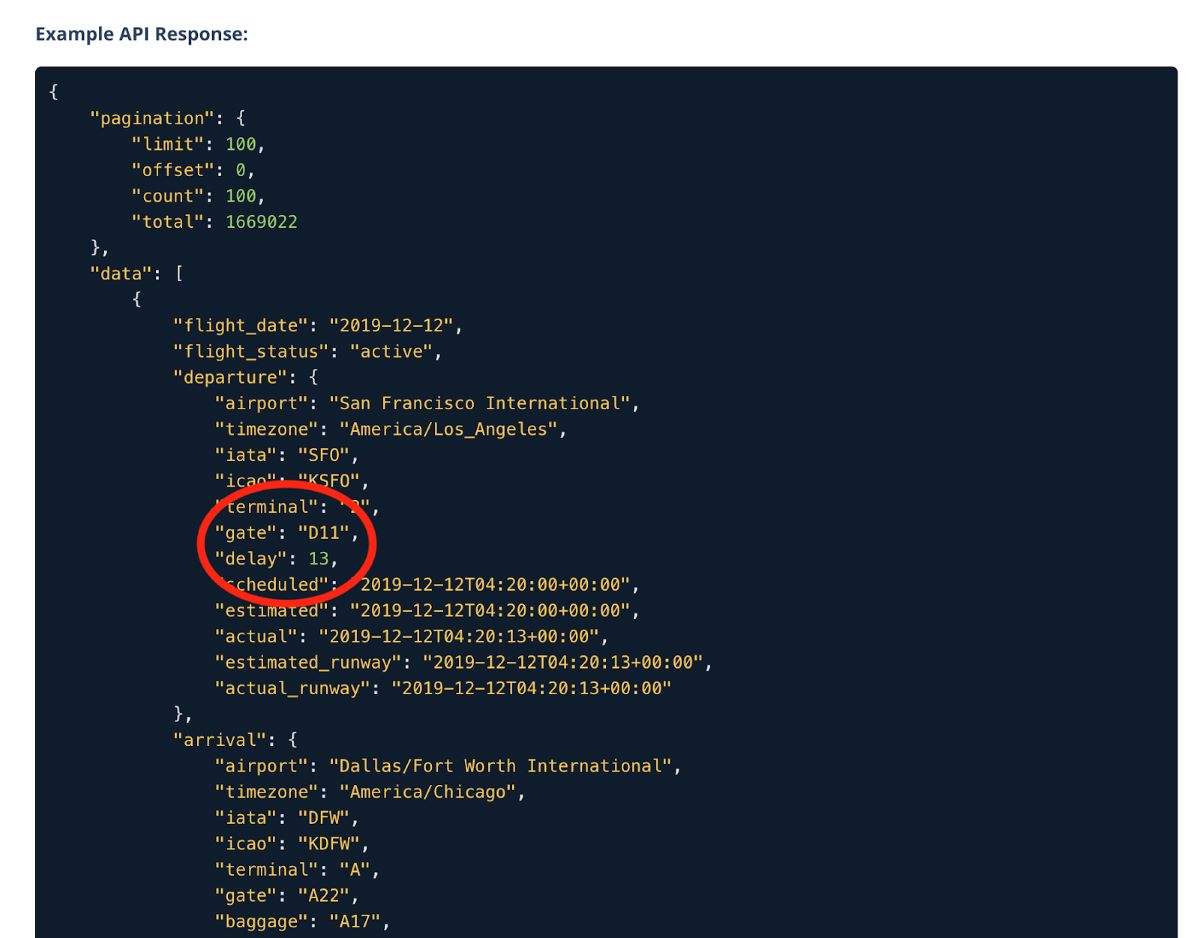
To get these, we need to pull the first array index of the data field, and then pull the gate and delay values off the departure object. Then we’ll compare them to the stored values from our cache. Here’s what that looks like:
					 if (fs.existsSync(flightDataFile)) {
           const cache = JSON.parse(fs.readFileSync(flightDataFile));
           const {delay, gate} = json.data[0].departure;
           if (cache.departure.delay !== delay || cache.departure.gate !== gate) {
		// send the email alert (see next step)
           }
       }
Step Seven: Sending the Email Notification
If there is a difference between the cache and the new data, we need to send the user an email. We’ll do this using Nodemailer.
Import and Configure Nodemailer
Setting up Nodemailer is quick and easy, and allows you to send basic text-only emails directly from your server, using your Gmail account. Configure it at the top of your index file:
					const nodemailer = require('nodemailer')
const transporter = nodemailer.createTransport({
 service: 'gmail',
 auth: {
   user: 'your-email@gmail.com',
   pass: 'your-app-password' // NOT your regular Gmail password
 }
});
Create the Email
We want to pull the new information from the API response and include it in the email. Right now, we’re just including the delay and gate information, but you could include whatever info about the flight you want in this email.
Add this code inside the if cache.departure.delay check to interpolate the string of the email body and add the user’s email address:
					  const mailOptions = {
      from: 'your-email@gmail.com',
      to: email,
      subject: 'Your flight details have changed',
      text: `There is new information for flight ${flightNumber}. Delay: ${delay}. Gate: ${gate}`
   };
Send the Email
Sending the email can be done in a single line of code. Nodemailer returns an object to you telling you whether or not the send was successful. You can use this object for error handling. For now, we’ll just log it to the console.
					  transporter.sendMail(mailOptions, (error, info) => {
       if (error) {
           console.error('Error:', error);
       } else {
           console.log('Email sent:', info.response);
       }
   });
Step Eight: Polling
Right now, we’re only sending an email when the user clicks the “Notify Me” button. But we don’t just want to send an email when the user taps “Notify Me.” We want to poll the Aviationstack API endpoint every five minutes, look at the data, and automatically send the user a notification if something has changed.
So let’s move the Aviationstack API call and everything that happens after that into a polling function.
Create Polling Function
We’ll write a polling function in a helper file called poll.js and have it call our API by wrapping the API in a separate function call and passing that function. After it’s been called for the first time, the polling function calls the function passed to it on a five-minute interval. This function lacks rate-limiting or caching.
					export function startPolling(fn, options = {}) {
 const interval = options.interval || 5 * 60 * 1000; // Default: 5 minutes
 let stopped = false;


 async function poll() {
   if (stopped) return;


   try {
     await fn();
   } catch (err) {
     console.error("Polling function error:", err);
   } finally {
     if (!stopped) {
       setTimeout(poll, interval);
     }
   }
 }


 poll();


 return {
   stop() {
     stopped = true;
   },
   resume() {
     if (stopped) {
       stopped = false;
       poll();
     }
   }
 };
}
Now, we can use this function to poll our Aviationstack endpoint and send our email. When the initial request comes in from our frontend, we’ll just pull and cache the flight data. Then the polling function will start its first five-minute countdown before it calls the API again.
Pass Cache Checking Logic to Polling Function
We’re going to extract all the logic of checking the cache and sending the email into a separate function called checkCacheAndNotify. We’ll pass the Express req object to this function so we have access to it. Then, we’ll pass this function to our startPolling function to be called at a five minute interval.
Here’s the code:
					const checkCacheAndNotify = async (req, res) => {
   const {flightNumber, airportCode, userEmail} = req.query;
   const response = await fetch(AVIATIONSTACK_API_URL + `?access_key=${AVIATIONSTACK_API_KEY}&flight_iata=${flightNumber}&dep_iata=${airportCode}`);
   const json = await response.json();
   try {
       if (fs.existsSync(flightDataFile)) {
           const cache = JSON.parse(fs.readFileSync(flightDataFile));
           const {delay, gate} = json.data[0].departure;
           if (cache.departure.delay !== delay || cache.departure.gate !== gate) {
               const mailOptions = {
                   from: 'your-email@gmail.com',
                   to: userEmail,
                   subject: 'Your flight details have changed',
                   text: `There is new information for flight ${flightNumber}. Delay: ${delay}. Gate: ${gate}`
               };
               transporter.sendMail(mailOptions, (error, info) => {
                   if (error) {
                       throw error
                   } else {
                       console.log('Email sent:', info.response);
                   }
               });
           }
       }
       const toWrite = JSON.stringify(json.data[0]);
       fs.writeFileSync(flightDataFile, toWrite);
       res.send("Signed user up for email notifications")
       } catch(err) {
           res.status(500).send(err)
       }
}
That’s our checkCacheAndNotify function. Here’s the call to startPolling:
					 if (isValid) {
       startPolling(() => checkCacheAndNotify(req, res))
   }
And let’s not forget we need to require startPolling at the top of our index file:
const { startPolling } = require("./poll");
Step Nine: Write the Client Side Request Function
Now we’re ready to return to the client and write the onPressNotifyMe function that kicks all this off. Here’s how it will go:
- grab the user’s input from state
- format it into a request object
- use fetch to send the request to our backend
- handle the backend’s response
In this case, handling the backend’s response will just mean displaying a message to the user that we’ve signed them up for email notifications about their flight. Right now, this is what our onPressNotify function looks like:
					  const onPressNotifyMe = () => {
   //TODO
  }
Here’s the code that will send our flight number and IATA code to the server:
					const onPressNotifyMe = async () => {
     try {
       const response = await fetch(`/notify?userEmail=${userEmail}&flightNumber=${flightNumber}&airportCode=${airportCode}`);
       if (response.ok) {
         alert("You've been signed up for email notifications about this flight.")
       }
     } catch(err) {
       console.error(err)
     }
  }
Now, when the user taps “Notify Me” the info gets sent to the server, and we display a little message that they’ve been signed up for notifications.
Putting it All Together
Let’s recap what we did in this tutorial:
- We used Create React App to spin up a React frontend that accepts a user’s email address, flight number and airport IATA code
- We used Node and Express to build a backend server that receives that information from our client
- We validated the email address using the Mailboxlayer API
- We pulled the user’s real-time flight data from the Aviationstack API
- We cached the data and set up polling to pull the data every five minutes and email the user if there are any changes.
- If there are changes, we send the user an email using Nodemailer and our own Gmail account
- We let the user know in the UI that they were signed up to receive email alerts
Complete Code
Here’s the complete front and backend code for the email alert system.
App.js
					import './App.css';
import { useState } from 'react';


function App() {


  const [userEmail, setUserEmail] = useState("");
  const [flightNumber, setFlightNumber] = useState("");
  const [airportCode, setAirportCode] = useState("");


  const onPressNotifyMe = async () => {
     try {
       const response = await fetch(`/notify?userEmail=${userEmail}&flightNumber=${flightNumber}&airportCode=${airportCode}`);
       if (response.ok) {
         alert("You've been signed up for email notifications about this flight.")
       }
     } catch(err) {
       console.error(err)
     }
  }


 return (
   <div className="App">
     <header className="App-header">
      <h1><span class="ez-toc-section" id="Welcome-2"></span>Welcome!<span class="ez-toc-section-end"></span></h1>
      <h2><span class="ez-toc-section" id="Sign_up_for_email_notifications_about_your_flight-2"></span>Sign up for email notifications about your flight<span class="ez-toc-section-end"></span></h2>
      <div className='flight-data'>
       <input
         type="text"
         placeholder='Your flight number'
         value={flightNumber}
         onChange={(e) => setFlightNumber(e.target.value)}
         className='input'
       />
       <input
         type="text"
         placeholder='Your airport IATA code'
         value={airportCode}
         onChange={(e) => setAirportCode(e.target.value)}
         className='input'
       />
      </div>
      <input
        type="text"
        placeholder='your@email.address'
        value={userEmail}
        onChange={(e) => setUserEmail(e.target.value)}
        className='input'
      />
      <button onClick={onPressNotifyMe} className='button'>Notify Me</button>
     </header>
   </div>
 );
}


export default App;
App.css
					.App {
 text-align: center;
}


.App-header {
 background-color: #282c34;
 min-height: 100vh;
 display: flex;
 flex-direction: column;
 align-items: center;
 justify-content: center;
 font-size: calc(10px + 2vmin);
 color: white;
}


.flight-data {
 display: flex;
 justify-content: space-between;
 margin-bottom: 2rem;
 width: 50%;
}


.input {
border: none;
outline: none;
padding: 1rem;
width: 25%;
}


.button {
margin-top: 2rem;
padding: 1rem;
width: 25%;
font-weight:bolder;
background-color: purple;
color: white;
border: none;
box-shadow: none;
cursor: pointer;
}
index.js
					const express = require("express");
const PORT = process.env.PORT || 3000;
const app = express();


require('dotenv').config();
const MAILBOXLAYER_API_KEY = process.env.MAILBOXLAYER_KEY;
const MAILBOXLAYER_API_URL = process.env.MAILBOXLAYER_URL;
const AVIATIONSTACK_API_KEY = process.env.AVIATIONSTACK_KEY;
const AVIATIONSTACK_API_URL = process.env.AVIATIONSTACK_URL;


const fs = require('fs')
const flightDataFile = '/tmp/flight-data.json'


const nodemailer = require('nodemailer');


const transporter = nodemailer.createTransport({
 service: 'gmail',
 auth: {
   user: 'your-email@gmail.com',
   pass: 'your-app-password' // NOT your regular Gmail password
 }
});


const { startPolling } = require("./poll");


const checkCacheAndNotify = async (req, res) => {
   const {flightNumber, airportCode, userEmail} = req.query;
   const response = await fetch(AVIATIONSTACK_API_URL + `?access_key=${AVIATIONSTACK_API_KEY}&flight_iata=${flightNumber}&dep_iata=${airportCode}`);
   const json = await response.json();


   try {
       if (fs.existsSync(flightDataFile)) {
           const cache = JSON.parse(fs.readFileSync(flightDataFile));
           const {delay, gate} = json.data[0].departure;
           if (cache.departure.delay !== delay || cache.departure.gate !== gate) {
               const mailOptions = {
                   from: 'your-email@gmail.com',
                   to: userEmail,
                   subject: 'Your flight details have changed',
                   text: `There is new information for flight ${flightNumber}. Delay: ${delay}. Gate: ${gate}`
               };
               transporter.sendMail(mailOptions, (error, info) => {
                   if (error) {
                       console.error(error)
                   } else {
                       console.log('Email sent:', info.response);
                   }
               });
           }
       }
       const toWrite = JSON.stringify(json.data[0]);
       fs.writeFileSync(flightDataFile, toWrite);
       res.send("Signed user up for email notifications")
       } catch(err) {
           console.error(err)
           res.status(500).send(err.message)
       }
}


app.get('/notify', async (req, res) => {
   const {userEmail} = req.query;
   const response = await fetch(MAILBOXLAYER_API_URL + `?access_key=${MAILBOXLAYER_API_KEY}&email=${userEmail}`);
   const json = await response.json();
   const isValid = json.format_valid;


   if (isValid) {
       try {
           startPolling(() => checkCacheAndNotify(req, res))
       } catch(err) {
           console.error(err)
       }


   }
})


app.listen(PORT, () => {
console.log(`Server listening on ${PORT}`);
});
poll.js
					export function startPolling(fn, options = {}) {
const interval = options.interval || 5 * 60 * 1000; // Default: 5 minutes
let stopped = false;


async function poll() {
  if (stopped) return;


  try {
    await fn();
  } catch (err) {
    console.error(err)
  } finally {
    if (!stopped) {
      setTimeout(poll, interval);
    }
  }
}


poll();


return {
  stop() {
    stopped = true;
  },
  resume() {
    if (stopped) {
      stopped = false;
      poll();
    }
  }
};
}
Next Steps
Right now, this is a very basic setup and there are many ways it could be improved. For example, we only handle one flight – but what if the user wants to get notifications about multiple flights? We’re also not doing any rate-limiting on the polling function, and all of our error handling is very bare-bones. Ideally, we should be re-trying any failed requests. We could also style the UI better and display the flight information to our user there so they can easily check updates.
Aviationstack and Mailboxlayer: A One-Two Punch
This article should have given you a good jumping-off point to explore all the capabilities of the Aviationstack flight API and Mailboxlayer email validation service on your own. Take your project to the next level by implementing one of the next steps, or explore one of APILayer’s other APIs to add additional functionality to your app.
FAQs
What is a flight tracker?
A flight tracker lets users track up-to-the-minute information about their flight, or returns data about flights based on parameters provided by the user.
How do I access free real time flight data with Aviationstack?
There are several free flight APIs that provide real-time data for building flight trackers, notification systems, and other applications. By signing up for a free account or trial account, you can get an access key that allows you to make a limited number of queries against the API to retrieve this data.
What is the Aviationstack API used for?
The Aviationstack API provides developers with access to global flight, airport and city information including schedules, departure and arrival data, gate information, delays, and more. Requests to the REST API are made using a straightforward HTTP GET URL structure and responses are provided in lightweight JSON format.
Can I build real-time automated flight updates using React Native?
Yes, but there are a couple of caveats. When building with React Native, you will not be able to use Expo Go to build your app, as there are limitations when it comes to implementing push notifications. Instead, you’ll need to do a full development build with Expo, which requires XCode.