Geolocation is all about figuring out where your users are in the real world. You can get this info using GPS, IP addresses, cell towers, or a mix of those. For devs, geolocation comes in handy for things like setting up geofences, sending location-specific content, tightening security, or even targeting ads more accurately. Basically, if you want your app to react based on where someone is — you’ll need geolocation.
In this article, we’ll learn how to build a simple geolocation app for an iOS device using React Native and the IPstack API. We’ll use IPtack to translate a user’s IP address into meaningful location data, and then feed that data into our React Native app to display a message to the user.
Table of Contents
Prerequisites
This tutorial assumes you’re familiar with JavaScript and have a basic understanding of what an API is. If not, you can start with this overview from AWS.
You’ll also need Node.js installed — which comes bundled with npm and npx (you’ll use npx to quickly run tools without installing them globally). Learn more about npx here.
Why a Mobile Geolocation App Needs Precise Location Data
A Mobile Geolocation App depends entirely on accurate and real-time location data to function correctly. Whether you’re building a delivery tracking system, a local services finder, or a location-based game, precise geolocation is critical. Using reliable geolocation APIs like ipstack ensures your app receives consistent latitude, longitude, timezone, and ISP data, improving user experience and accuracy. Without integrating a solid geolocation solution, your app risks showing inaccurate locations, leading to poor functionality and user frustration.
Best Practices to Enhance Your Mobile Geolocation App’s Accuracy
To further improve the reliability of your Mobile Geolocation App, always use fallback mechanisms for location retrieval. For example, combine GPS data with IP-based geolocation as a backup to ensure location detection even in low-signal environments. Regularly update the API’s location database to keep up with IP range changes and ensure maximum precision. Additionally, implement caching strategies to reduce repeated API calls and speed up response times, all while maintaining up-to-date user location data. These practices make your geolocation app more robust, scalable, and resistant to common errors.
Getting Started with IPstack Geolocation API for Mobile Development
IPstack is a geolocation API used by developers all over the world. It provides accurate and reliable geolocation data for any IP address, in JSON format, via secure HTTPS network calls.
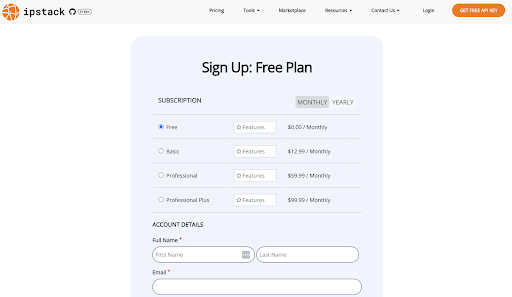
IPstack includes a free tier that allows up to 100 requests per month. We’ll use this tier to build and test our app. Head to IPstack sign up to create a free account and get your API key.
Once you’ve created your account, you’ll be taken to your dashboard, where you’ll see your API key, links to documentation, and a 3-step quickstart guide. Open the quickstart guide for a brief overview of the API endpoint URLs and request format.
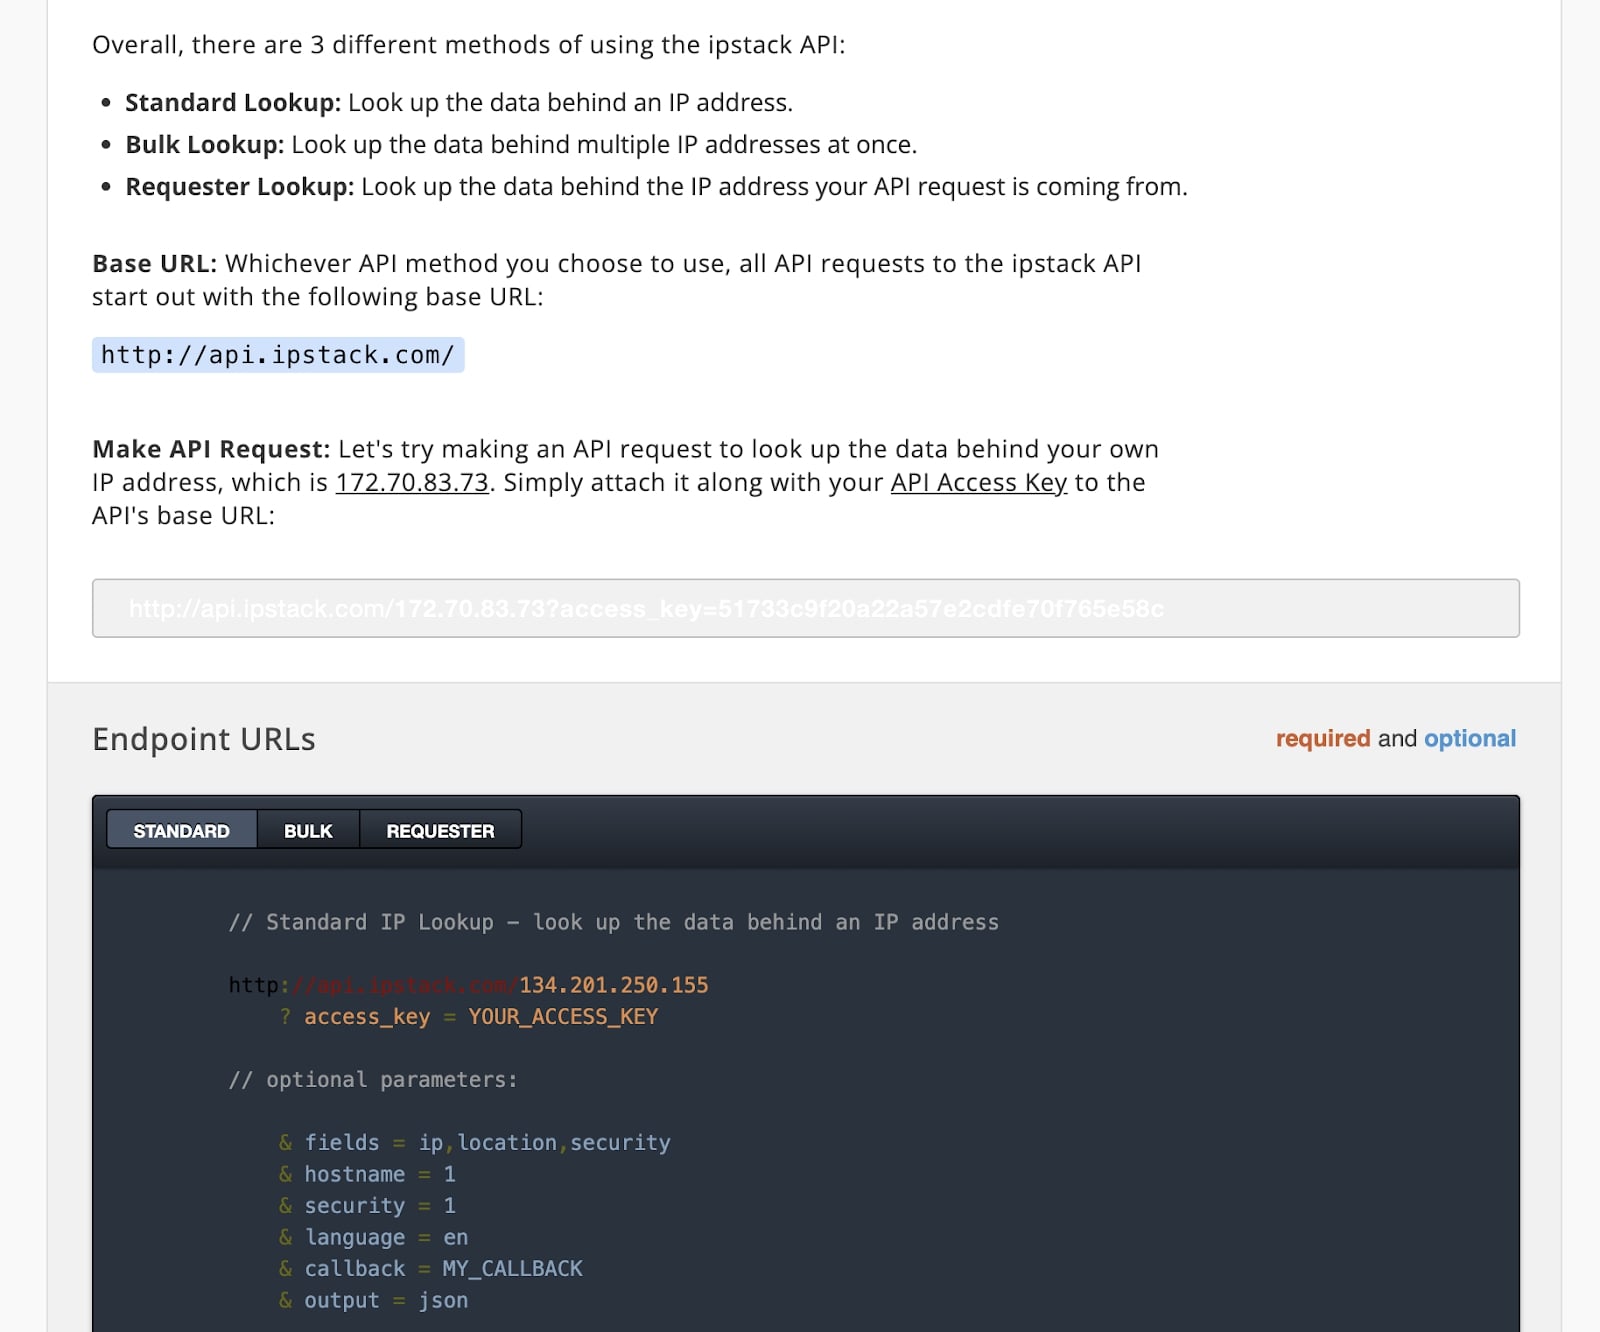
We’ll use the standard lookup endpoint for this tutorial, which allows us to look up geolocation data for a single IP address. Every request will be sent to the api.ipstack.com base URL, with the IP address you’re looking up as the path, and your API access key appended as a query parameter.
The standard lookup endpoint is easy to use, but feel free to check out the IPstack documentation for more detailed explanations of the request parameters, and to learn about the other endpoints.
For now, make sure you’re able to locate your access key and the base URL, and we’ll return to the API after we set up our React Native project.
Get Your Free
IP Geolocation Key!
IPstack
Join thousands of developers using ipstack for real-time IP intelligence!
Get Your Free API Key!100 Requests Free!
Setting up your React Native project
We’ll use Expo to develop our project. Expo is a framework that allows you to quickly build and test React Native projects on a smartphone. The React Native docs have an excellent Get Started guide, which we’ll go through here.
Install Dependencies
First, check that you have the correct version of npm installed by running
$ npm install -g npm
Next, create your Expo project by running
$ npx create-expo-app@latest
You’ll be taken through a series of steps to download Expo and any needed dependencies, name your project, and set up a directory. Once that’s done, head to Set up your environment – Expo Documentation to download the Expo app for your phone and set up your mobile environment. We’ll use iOS and Expo Go for this project, but feel free to choose whatever configuration works for you.

Based on the selections you make, a QR code will be generated, which you scan with your phone to download the Expo app from the App Store. Once you have the app on your phone, start the dev environment on your computer by running
					$ cd [your project name]
$ npx expo start
Another QR code will be generated in your terminal. Scan this with your phone to run the dev environment on your phone. Changes you make to code in your project on the computer will be reflected in the mobile app’s UI. Neat!
Test the Setup
To test that the environments are correctly set up, open the app/(tabs)/index.tsx file in your code editor and change the default Welcome text:
					    <ThemedView style={styles.titleContainer}>
	// change this…
<ThemedText type="title">Welcome!</ThemedText>
	// to this
       <ThemedText type="title">Change me!</ThemedText>
       <HelloWave />
     </ThemedView>
We changed the word “Welcome” to “Change me” and should now see this on the phone screen:

Prepare Your Index File
To keep things simple, we’ll be working directly in the existing app/(tabs)/index.tsx file. Once you’ve verified that changes are propagating, delete everything inside the ParallaxScrollView component inside app/(tabs)/index.tsx except the topmost ThemedView. Your HomeScreen component should now look like this:
					export default function HomeScreen() {
 return (
   <ParallaxScrollView
     headerBackgroundColor={{ light: '#A1CEDC', dark: '#1D3D47' }}
     headerImage={
       <Image
         source={require('@/assets/images/partial-react-logo.png')}
         style={styles.reactLogo}
       />
     }>
     <ThemedView style={styles.titleContainer}>
       <ThemedText type="title">Change me!</ThemedText>
       <HelloWave />
     </ThemedView>
   </ParallaxScrollView>
 );
}
Start Building
Inside the app/(tabs)/index.tsx file, we’ll write the code to lookup the IP address of the mobile device our app is running on, then send that IP address to the IPstack API. The API will look up geolocation data for the IP address, and return that data to us so we can display it to the user on the phone.
Getting the IP Address
Expo has a handy package called Network for accessing network information about the device it is currently running on, including MAC address, IP address, and airplane status mode. Unfortunately, when using this package in development mode (i.e. running the app using Expos’ Metro Bundler via the command line) the IP address it returns is the local (192.168.xxx.xxx) address of the bundler, and not the actual public IP of the device.
So for this tutorial, to get the public IP of the device, we’ll use a different package called react-native-public-ip. Install the package
$ npm install –-save react-native-public-ip
Once the package is installed, you can expose its methods by importing it into the top of your app/(tabs)/index.tsx file:
import publicIP from 'react-native-public-ip';
Then, you can use the getIPAddressAsync() method to get the IP address of the current device.
Write the Function
Define an async function called getIPAddress at the top of your HomeScreen component:
					const getIPAddress = async () => {
   const IP_ADDRESS = await publicIp();
   console.log(IP_ADDRESS);
 };
Right now, all we’re doing is logging the IP address to the terminal. We’ll use a React Hook called useEffect to call our function when the app mounts. Import useEffect from React and define the hook above the getIPAddress function, then call your own getIPAddress function inside the hook:
					import { useEffect } from 'react';


***
    // inside component
     useEffect(() => {
       getIPAddress();
     })
You may need to reload the app on the mobile device to force a mount and see the changes. Check the console on your computer to verify that the IP address is printing.
Make the API Request
Once we’ve verified that the getIPAddress function is being called and logging a public IP to the console, we need to send that IP to IPstack for geolocation. First, we’ll return it from the getIPAddress function instead of logging it to the console:
					  // replace this
    console.log(IP_ADDRESS);
    // with this
    return IP_ADDRESS;
Next, we’ll write a function called getGeoLocationData, which will call the getIPAddress function and use the returned IP address, plus our IPstack access key, to make a GET request to the IPstack endpoint. Then we set the returned data in React state.
Grab the Access Key and URL
First, we’ll need to grab the access key and IPstack base URL from IPstack. We’ve added the access key directly to the file here, for demo purposes, but in a real project, you should always put sensitive data like API keys in an environment file.
					// add useState to our imports
import { useEffect, useState } from 'react';// and define the access key and IPStack URL
const ACCESS_KEY = 'YOUR ACCESS KEY';
const IP_STACK_BASE_URL = 'http://api.ipstack.com/';


***


// in the component
  const [geoData, setGeoData] = useState({});


   const getGeoLocationData = async () => {
      const ip = await getIPAddress();
      const URL = IP_STACK_BASE_URL + ip + `?access_key=${ACCESS_KEY}`;
      try {
        const data = await fetch(URL);
        const json = await data.json();
        setGeoData(json);
      } catch (error) {
        console.error(error)
      }
    }
There are a few things happening in the component, so let’s break it down. First, we initialize our state, where we’ll store our geolocation data. Next, we get our IP address using our existing function. We create the complete IPstack URL by appending the IP address and our access key to the base URL.
Make the Request
We then use fetch (a React global for making HTTP requests) to send the request to the API and capture the response in a variable called data. We wrapped the call in a try/catch block to make sure we handle any network errors, then we retrieve the json value of the data object, and set it in the React state.
We’ll now call our getGeoLocationData function inside useEffect, instead of the getIPAddress function:
					 useEffect(() => {
   // replace this
   getIPAddress();
   // with this
   getGeoLocationData();
 })
Use the Data
The response we get back from the IPstack API looks something like this (I’ve obfuscated the actual data for privacy):
					{
  "ip": "xxx.xx.xxx.xxx",
  "type": "ipv4",
  "continent_code": "NA",
  "continent_name": "North America",
  "country_code": "US",
  "country_name": "United States",
  "region_code": "xxx",
  "region_name": "Fake State",
  "city": "Fakesville",
  "zip": "xxxxx",
  "latitude": xx.xxxxxx,
  "longitude": xx.xxxxx,
  "msa": "xxx",
  "dma": "xxx",
  "radius": null,
  "ip_routing_type": "fixed",
  "connection_type": "tx",
  "location": {
    "geoname_id": xxxxx,
    "capital": "Washington D.C.",
    "languages": [
      {
        "code": "en",
        "name": "English",
        "native": "English"
      }
    ],
    "country_flag": "https://assets.ipstack.com/flags/us.svg",
    "country_flag_emoji": "🇺🇸",
    "country_flag_emoji_unicode": "U+1F1FA U+1F1F8",
    "calling_code": "1",
    "is_eu": false
  }
}
This data could be used in a multitude of ways. We could use the latitude and longitude values to render a map that shows the user’s exact location and surrounding landmarks, or establish their proximity to a geofence, which could be used to send them localized advertising content (such as a deal for a nearby restaurant, etc.)
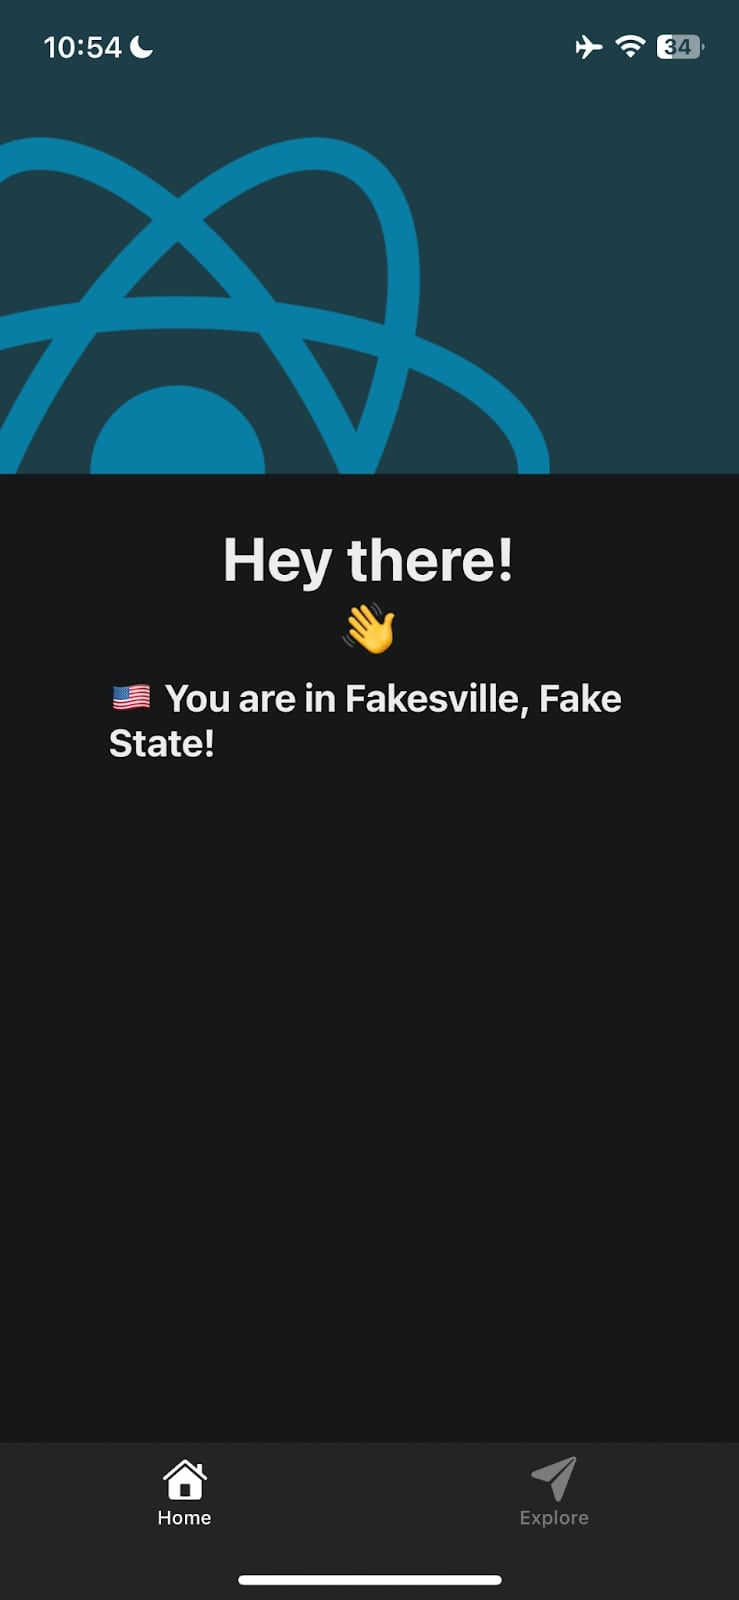
For this tutorial, we’ll keep things simple and just use the country_flag_emoji and the city and region values to show our user a message telling them where they are.
Display the Results
First, create a new ThemedText component underneath our existing text, and have it render an interpolated string containing information from our geoData object:
					     <ThemedView style={styles.titleContainer}>
       <ThemedText type="title">Change me!</ThemedText>
       <HelloWave />
       // add this
       <ThemedText type="subtitle">{geoData.flag_emoji} You are in {geoData.city}, {geoData.region}!</ThemedText>
     </ThemedView>
If your code editor is set up to handle Typescript, you’ll probably get errors telling you that flag_emoji, city, and region don’t exist on type {}. That’s because we didn’t specifically define what React State should expect to receive when we set the geoData variable. So let’s add those properties:
const [geoData, setGeoData] = useState({flag_emoji: '', city: '', region: ''});
Next, to make things render on separate lines, we need to make a small adjustment in the CSS styling for this component. In the titleContainer styles object, remove the flexDirection: row value:
					titleContainer: {
   // flexDirection: 'row', remove this
   alignItems: 'center',
   gap: 8,
 },
Update Styles
Finally, let’s update our initial text from Change me! to something more relevant, like Hey there!
<ThemedText type="title">Hey there!</ThemedText>
Now, head to the app on your mobile device, and you should see the properties from your JSON object rendered in the text string.
The Complete Component
Here’s the complete code for the component, which is doing the following:
- Looking up the device IP
- Creating a request URL by combining the IPstack base URL, IP address, and our IPstack access key
- Sending the request
- Capturing the returned data in state
- Rendering that state to the app UI
					import { Image, StyleSheet, Platform } from 'react-native';
import { HelloWave } from '@/components/HelloWave';
import ParallaxScrollView from '@/components/ParallaxScrollView';
import { ThemedText } from '@/components/ThemedText';
import { ThemedView } from '@/components/ThemedView';


import { useEffect, useState } from 'react';
import publicIP from 'react-native-public-ip';


const ACCESS_KEY = 'YOUR ACCESS KEY';
const IP_STACK_BASE_URL = 'http://api.ipstack.com/';


export default function HomeScreen() {


 const [geoData, setGeoData] = useState({flag_emoji: '', city: '', region: ''});


 useEffect(() => {
   getGeoLocationData();
 })


 const getIPAddress = async () => {
   const IP_ADDRESS = await publicIP();
   return IP_ADDRESS;
 };


 const getGeoLocationData = async () => {
   const ip = await getIPAddress();
   const URL = IP_STACK_BASE_URL + ip + `?access_key=${ACCESS_KEY}`;
   try {
     const data = await fetch(URL);
     const json = await data.json();
     setGeoData(json);
   } catch (error) {
     console.error(error)
   }
 }


 return (
   <ParallaxScrollView
     headerBackgroundColor={{ light: '#A1CEDC', dark: '#1D3D47' }}
     headerImage={
       <Image
         source={require('@/assets/images/partial-react-logo.png')}
         style={styles.reactLogo}
       />
     }>
     <ThemedView style={styles.titleContainer}>
       <ThemedText type="title">Hey there!</ThemedText>
       <HelloWave />
       <ThemedText type="subtitle">{geoData.flag_emoji} You are in {geoData.city}, {geoData.region}!</ThemedText>
     </ThemedView>
   </ParallaxScrollView>
 );
}


const styles = StyleSheet.create({
 titleContainer: {
   // flexDirection: 'row',
   alignItems: 'center',
   gap: 8,
 },
 stepContainer: {
   gap: 8,
   marginBottom: 8,
 },
 reactLogo: {
   height: 178,
   width: 290,
   bottom: 0,
   left: 0,
   position: 'absolute',
 },
});
Summing Up
That’s how easy it is to geolocate a user in your own applications! Expo makes it very easy to get up and running: all you need is a free account from IPstack, and some familiarity with React. From here, try exploring the APILayer to add functionality like email verification, or to show your users information like currency exchange rates or weather in their local area.
Frequently Asked Questions
What is IPstack and how does it work with React Native?
IPstack is a geolocation API that converts IP addresses into location data including country, region, city, and geographic coordinates. In a Mobile Geolocation App built with React Native, you can make HTTP requests to IPstack’s endpoints to retrieve this data and display it in your mobile application seamlessly.
Do I need to pay for using IPstack in my React Native app?
IPstack offers a free tier that allows up to 100 requests per month, which is sufficient for development and testing your Mobile Geolocation App. For production applications with higher volume, they offer paid plans starting at $11.99/month for 50,000 requests.
Can I use IPstack to get a user’s exact GPS location?
No, IPstack provides geolocation based on IP address lookup, which typically identifies a general area (city/region) rather than precise GPS coordinates. For exact GPS location, you would need to use React Native’s built-in location services that access the device’s GPS in your mobile geolocation app.
Is this tutorial compatible with both iOS and Android devices using Expo Go?
Yes, this tutorial is compatible with both iOS and Android devices running Expo Go. The React Native and IPstack integration works the same way regardless of the mobile platform, allowing you to build a cross-platform mobile geolocation app.
How accurate is IP-based geolocation compared to GPS?
IP-based geolocation (like IPstack) typically has city-level accuracy, meaning it can identify the general area a user is in but not their exact address or location. GPS can be accurate to within a few meters but requires location permissions and active satellite connection in a mobile geolocation app.
How can I handle errors when the IPstack API is unavailable?
In a production mobile geolocation app, you should expand the error handling in the try/catch block to display appropriate messages to users when the API is unavailable. You might also want to implement caching of previous location results as a fallback to improve reliability.
Can I use this geolocation data for marketing purposes?
Yes, geolocation data can be used for regional marketing, localized content, and targeted promotions. However, make sure your app’s privacy policy clearly discloses that you collect location data and how you use it to comply with privacy regulations.
Is IPstack GDPR compliant for European users?
IPstack can be used in GDPR-compliant applications, but you need to ensure your own implementation follows GDPR requirements by obtaining proper consent before collecting location data from European users and providing them control over their data.
🔗 Related API Integration Projects You Should Explore
- Build Location-Aware AI Chatbots
Learn how to create intelligent chatbots that adapt based on user location using IPstack.
👉 Read the full guide - Integrate a Real-Time Weather Dashboard
Discover how to add live weather updates to your app with Weatherstack API for accurate forecasting.
👉 Check out the tutorial - Build a Real-Time News App
See how to develop a dynamic news app that delivers the latest headlines using Mediastack API.
👉 Explore the step-by-step guide