Embracing the cutting-edge trend, ‘Serverless REST API’ architectures are revolutionizing how we build software. They address the challenges posed by microservices and enhance today’s distributed systems, making serverless solutions more than just a buzzword—they’re a transformative approach to modern software infrastructure.
Table of Contents
What is Serverless
First of all, Serverless does not mean that you do not need servers for your program to run.
Servers are definitely used in serverless architectures. Serverless architecture allows developers to focus more on business. The important point here is that the management of these servers, and therefore many operational work that occur, are no longer ours but the service providers’ problem.
Usually a function works in an event driven approach. This trigger can be an http call or it can be triggered by a timer, bus, queue or file upload to the service.
In other words, we sort of outsource the operational work, which is one of the most important difficulties of running software in production. It is clear that the concept of serverless is misleading in terms of its literal meaning. Another term used instead of Serverless is FaaS, which Functions as a Service.

One of the most important features of the serverless architecture is “Pay as you go”.
In traditional systems, resources are increased at certain intervals. For example, you have 1000MB of RAM for 1-100 requests, but you will allocate the same resource for each request in that range. Since the requests used in the serverless system are answered with the request result relation you will only utilize just enough resources for the exact amount of requests.
Enhancing Serverless Solutions with APILayer APIs
Integrating APILayer into Serverless Architectures enables developers to leverage a wide array of serverless-ready APIs, enhancing applications with powerful, pre-built functionalities. This synergy allows for rapid development cycles, as APILayer’s APIs are designed to work seamlessly within serverless environments, offering scalable and efficient solutions without the overhead of server management. Utilizing APILayer’s services within a serverless API framework simplifies complex processes, ensuring developers can focus on delivering value and innovation in their applications.
Boilerplate Project
In this section, we will develop a Serverless Rest API with Node.js and Mongo. AWS Lambda will be used.
*The application will be explained assuming that you have an AWS account.
*The Serverless Framework will be used in deployment and service creation processes.
Throughout the article, it will be assumed that it has been downloaded to your computer and AWS configurations have been made.
Creating the service
We will run the command that will create our service with the help of Serverless Framework from the terminal screen. With this command, we will define AWS with Node.js and specify the path.
|
1 2 3 |
serverless create --template aws-nodejs --path serverless-nodejs-app |
Installing libraries
There will be several modules that we will use throughout the application and we will load them into the application. Before deploying our application to AWS, we will install the Serverless Offline plugin to run it locally. Next, we will install Mongoose, a popular ORM, so that MongoDB and our application layer can communicate and easy to perform CRUD operations. Finally, we will install the dotenv, where we keep our configs and keys to the application.
We will enter the directory of the application and run the following commands.
|
1 2 3 4 5 |
npm init -y npm i --save-dev serverless-offline npm i --save mongoose dotenv |
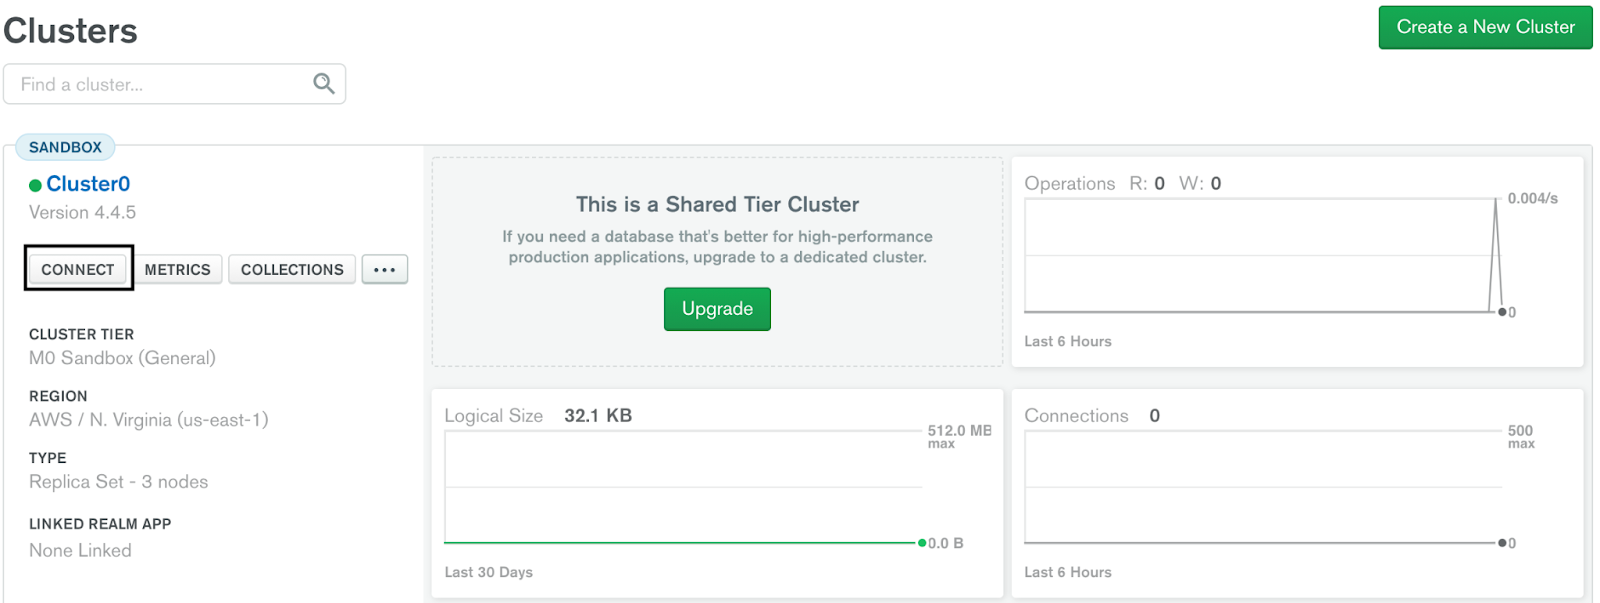
Creating a database on MongoDB Atlas
We register on MongoDB Atlas and create a free Cluster. After creating the Cluster with the default information, we press the “CONNECT” button on the home page, where we will get the Cluster’s connection information.
By following the steps below, we reach the connection string.
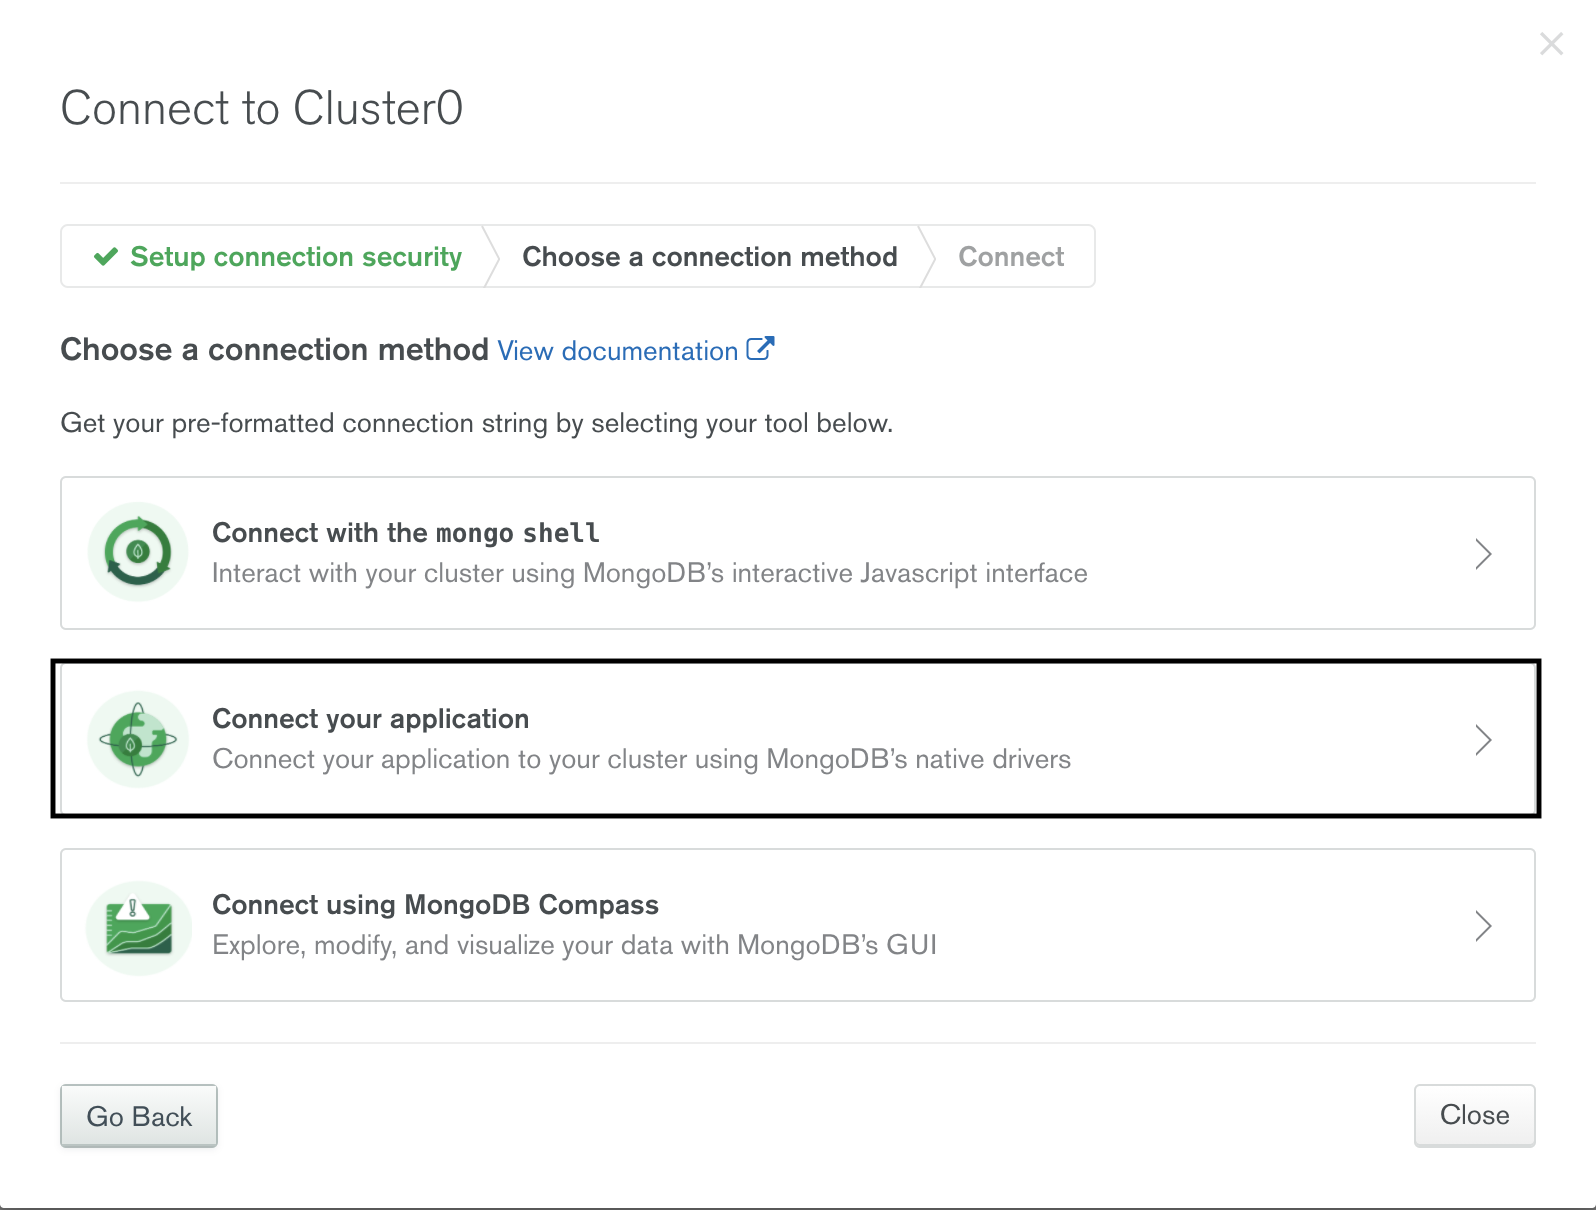
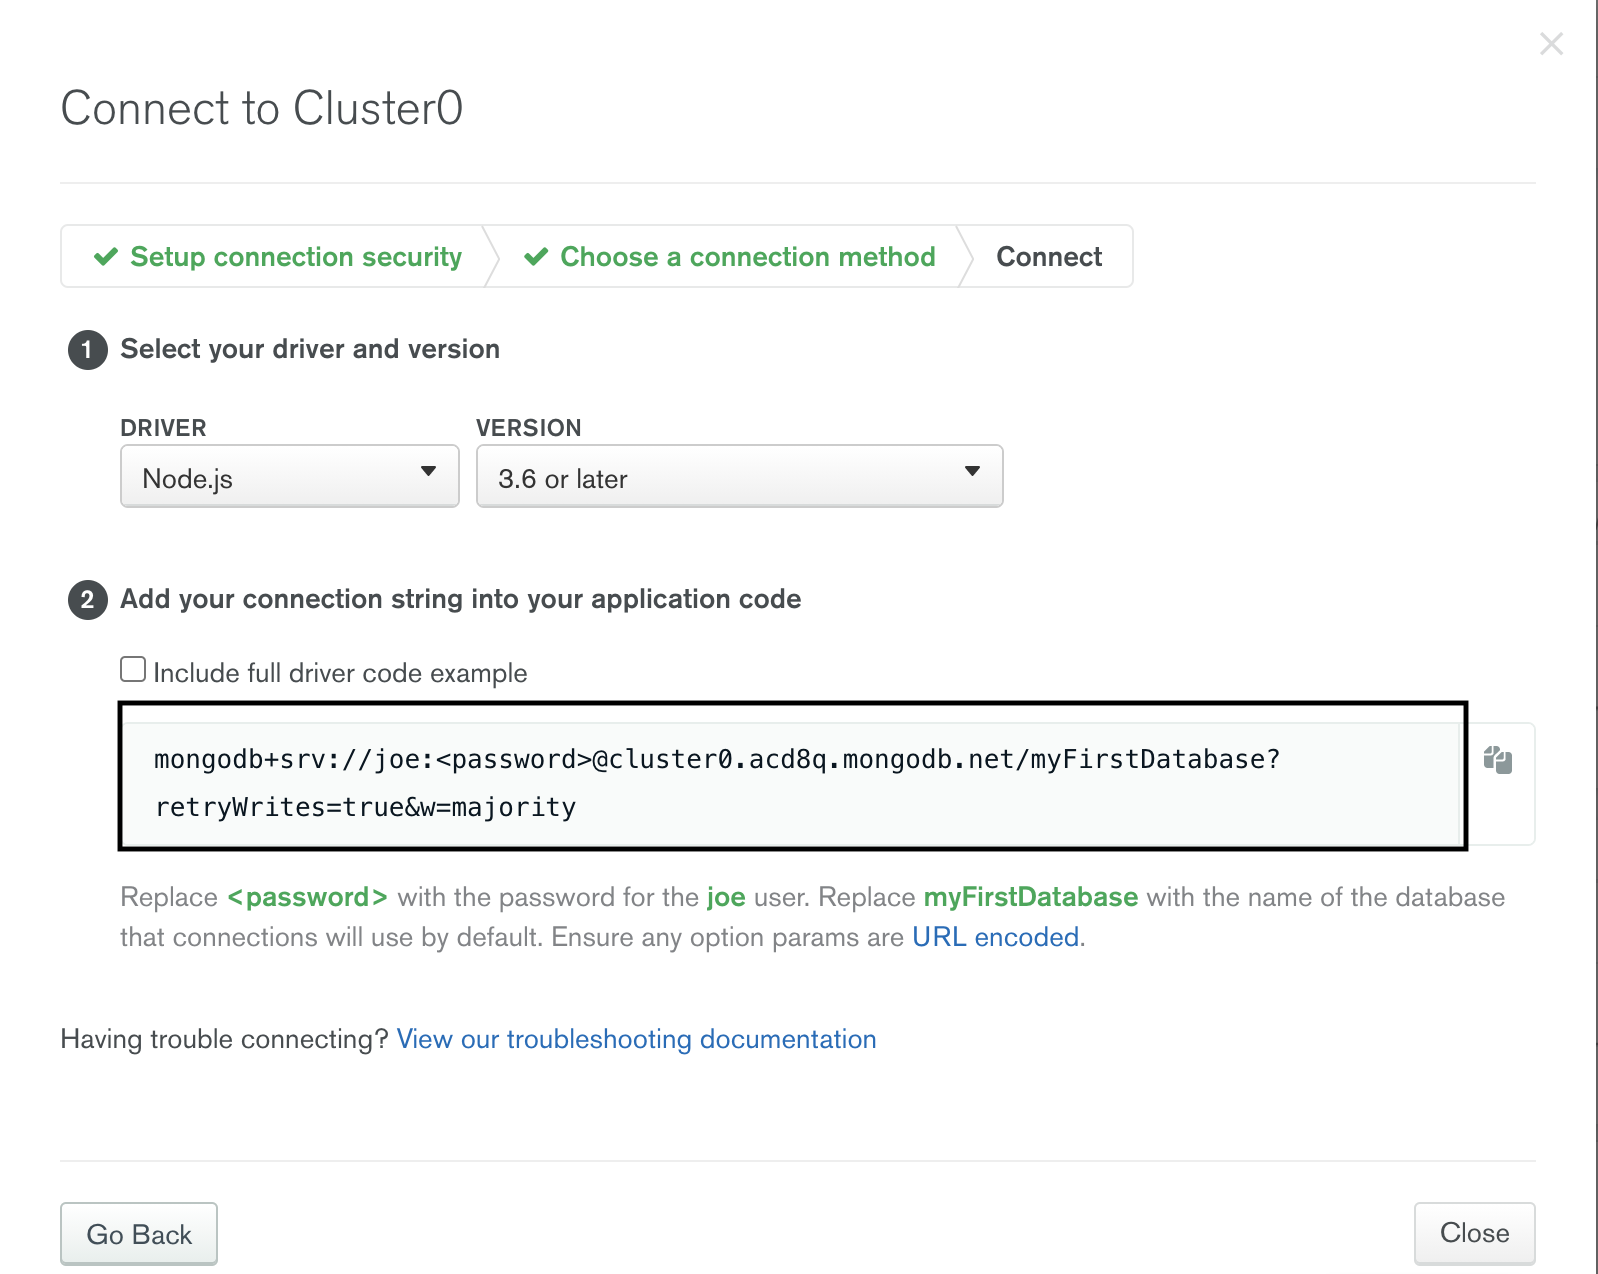
After these steps, we reach a connection string as above. Now we are creating a “variables.env” file in the project directory and we will keep our database information here. We paste the connection string into this file as follows:
In the "password" section of the connection string, type the password you determined while creating the Cluster. If you have not created the database user, you can create it from the “Database Access” tab.
Configure serverless.yml file
We will make configurations and definitions of our project with the serverless.yml file.
Copy the code below to the “serverless.yml” file.
|
1 2 3 4 5 6 7 8 9 10 11 12 13 14 15 16 17 18 19 20 21 22 23 24 25 26 27 28 29 30 31 32 33 34 35 36 37 38 39 40 41 42 43 44 45 46 47 48 49 50 51 |
service: rest-api provider: name: aws runtime: nodejs12.x memorySize: 128 timeout: 10 stage: dev region: us-east-1 functions: create: handler: handler.create # point to exported create function in handler.js events: - http: path: users method: post cors: true getOne: handler: handler.getOne events: - http: path: users/{id} method: get cors: true getAll: handler: handler.getAll events: - http: path: users method: get cors: true update: handler: handler.update events: - http: path: users/{id} method: put cors: true delete: handler: handler.delete events: - http: path: users/{id} method: delete cors: true plugins: - serverless-offline # adding the plugin to be able to run the offline emulation |
First of all, in addition to the default definitions of our application, we assigned the value of 128MB to the memorySize field where we manage memory.
Then, basically, we added five functions for CRUD operations. We will do the actions of these function definitions in the “handler.js” file in the next step. Under the “functions” field, we made the settings for creating, getOne, getAll, update and delete functions. We have defined the configurations of these functions, the handler and events fields, the path that creates our route, the function method, and the cors settings.
Finally, we included the serverless-offline plugin so we can test the application before deploying it to AWS.
Adding functions to handler.js
We will first define the 5 functions we need and create the first order of the behavior we want. After that, we can create the database connection and add database interaction logic with Mongoose.
After creating a handler.js file, let’s save the following Restful APIs in handler.js file
|
1 2 3 4 5 6 7 8 9 10 11 12 13 14 15 16 17 18 19 20 21 22 23 24 25 26 27 28 29 30 31 32 33 34 35 36 37 38 39 40 41 42 43 44 45 46 47 48 49 50 51 52 53 54 55 56 57 58 59 60 61 62 63 64 65 66 67 68 69 70 71 72 73 74 75 76 77 78 79 80 81 82 83 84 85 86 87 88 89 90 91 92 93 94 95 96 |
'use strict'; require('dotenv').config({ path: './variables.env' }); module.exports.create = (event, context, callback) => { context.callbackWaitsForEmptyEventLoop = false; connectToDatabase() .then(() => { User.create(JSON.parse(event.body)) .then(user => callback(null, { statusCode: 200, body: JSON.stringify(user) })) .catch(err => callback(null, { statusCode: err.statusCode || 500, headers: { 'Content-Type': 'text/plain' }, body: 'Could not create the user.' })); }); }; module.exports.getOne = (event, context, callback) => { context.callbackWaitsForEmptyEventLoop = false; connectToDatabase() .then(() => { User.findById(event.pathParameters.id) .then(user => callback(null, { statusCode: 200, body: JSON.stringify(user) })) .catch(err => callback(null, { statusCode: err.statusCode || 500, headers: { 'Content-Type': 'text/plain' }, body: 'Could not fetch the user.' })); }); }; module.exports.getAll = (event, context, callback) => { context.callbackWaitsForEmptyEventLoop = false; connectToDatabase() .then(() => { User.find() .then(users => callback(null, { statusCode: 200, body: JSON.stringify(users) })) .catch(err => callback(null, { statusCode: err.statusCode || 500, headers: { 'Content-Type': 'text/plain' }, body: 'Could not fetch the user.' })) }); }; module.exports.update = (event, context, callback) => { context.callbackWaitsForEmptyEventLoop = false; connectToDatabase() .then(() => { User.findByIdAndUpdate(event.pathParameters.id, JSON.parse(event.body), { new: true }) .then(user => callback(null, { statusCode: 200, body: JSON.stringify(user) })) .catch(err => callback(null, { statusCode: err.statusCode || 500, headers: { 'Content-Type': 'text/plain' }, body: 'Could not fetch the user.' })); }); }; module.exports.delete = (event, context, callback) => { context.callbackWaitsForEmptyEventLoop = false; connectToDatabase() .then(() => { User.findByIdAndRemove(event.pathParameters.id) .then(user => callback(null, { statusCode: 200, body: JSON.stringify({ message: 'Removed user with id: ' + user._id, user: user }) })) .catch(err => callback(null, { statusCode: err.statusCode || 500, headers: { 'Content-Type': 'text/plain' }, body: 'Could not fetch the user.' })); }); }; |
Adding the database connection
The process of connecting to MongoDB is twofold. We need to create a dynamic way of creating the connection but also make sure to re-use the same connection if it’s available.
We are creating a db.js file and copying the following codes
|
1 2 3 4 5 6 7 8 9 10 11 12 13 14 15 16 |
const mongoose = require('mongoose'); mongoose.Promise = global.Promise; let isConnected; module.exports = connectToDatabase = () => { if (isConnected) { return Promise.resolve(); } return mongoose.connect(process.env.DB) .then(db => { isConnected = db.connections[0].readyState; }); }; |
After defining database configurations for the project, we are adding this snippet to the top of the handler.js
|
1 2 3 4 |
// top of handler.js const connectToDatabase = require('./db'); |
Adding a model
When we take another look at Handler.js, you can see that we call the User model in functions to retrieve the data.
We create the models folder in the project directory and create a User.js file into it. Paste the codes below into the User.js file.
|
1 2 3 4 5 6 7 8 |
const mongoose = require('mongoose'); const UserSchema = new mongoose.Schema({ firstName: String, lastName: String }); module.exports = mongoose.model('User', UserSchema); |
Using Mongoose ORM, we have made definitions that we can easily perform CRUD operations related to the User model. We are adding this snippet to the top of the handler.js
|
1 2 3 4 |
// top of handler.js const User = require('./models/User'); |
Finally, make sure that the definitions at the top of the handler.js file are like this:
|
1 2 3 4 5 |
require('dotenv').config({ path: './variables.env' }); const connectToDatabase = require('./db'); const User = require('./models/User'); |
Testing on local
We’re ready to test the API. First of all, we need to run Serverless Offline.
We run the code below from the project folder in the terminal,
|
1 2 3 |
sls offline start --skipCacheInvalidation |
After running it, the project starts working locally and gives an output like the following on the terminal screen.
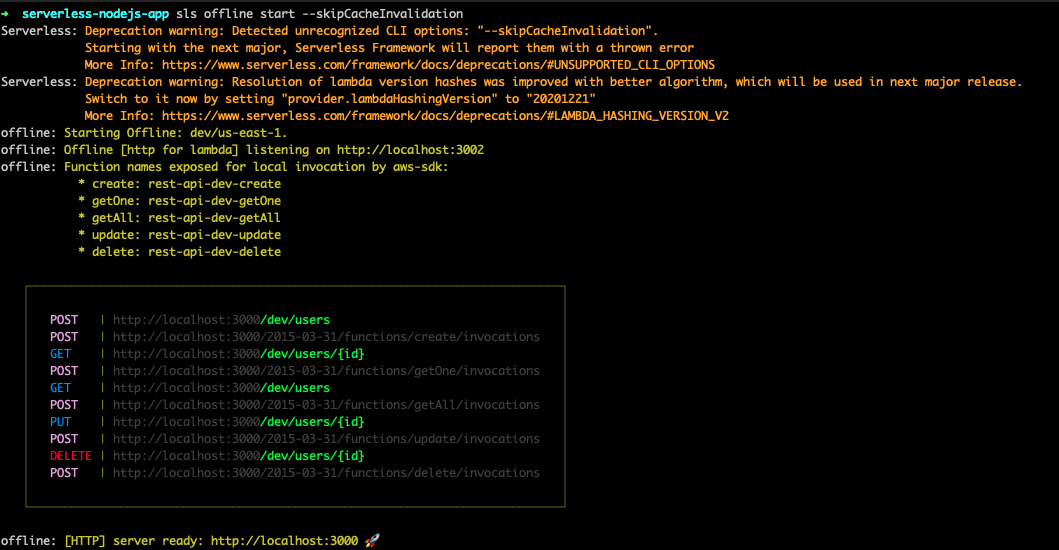
You can test the generated endpoints through Postman. You can see the results of my tests below.
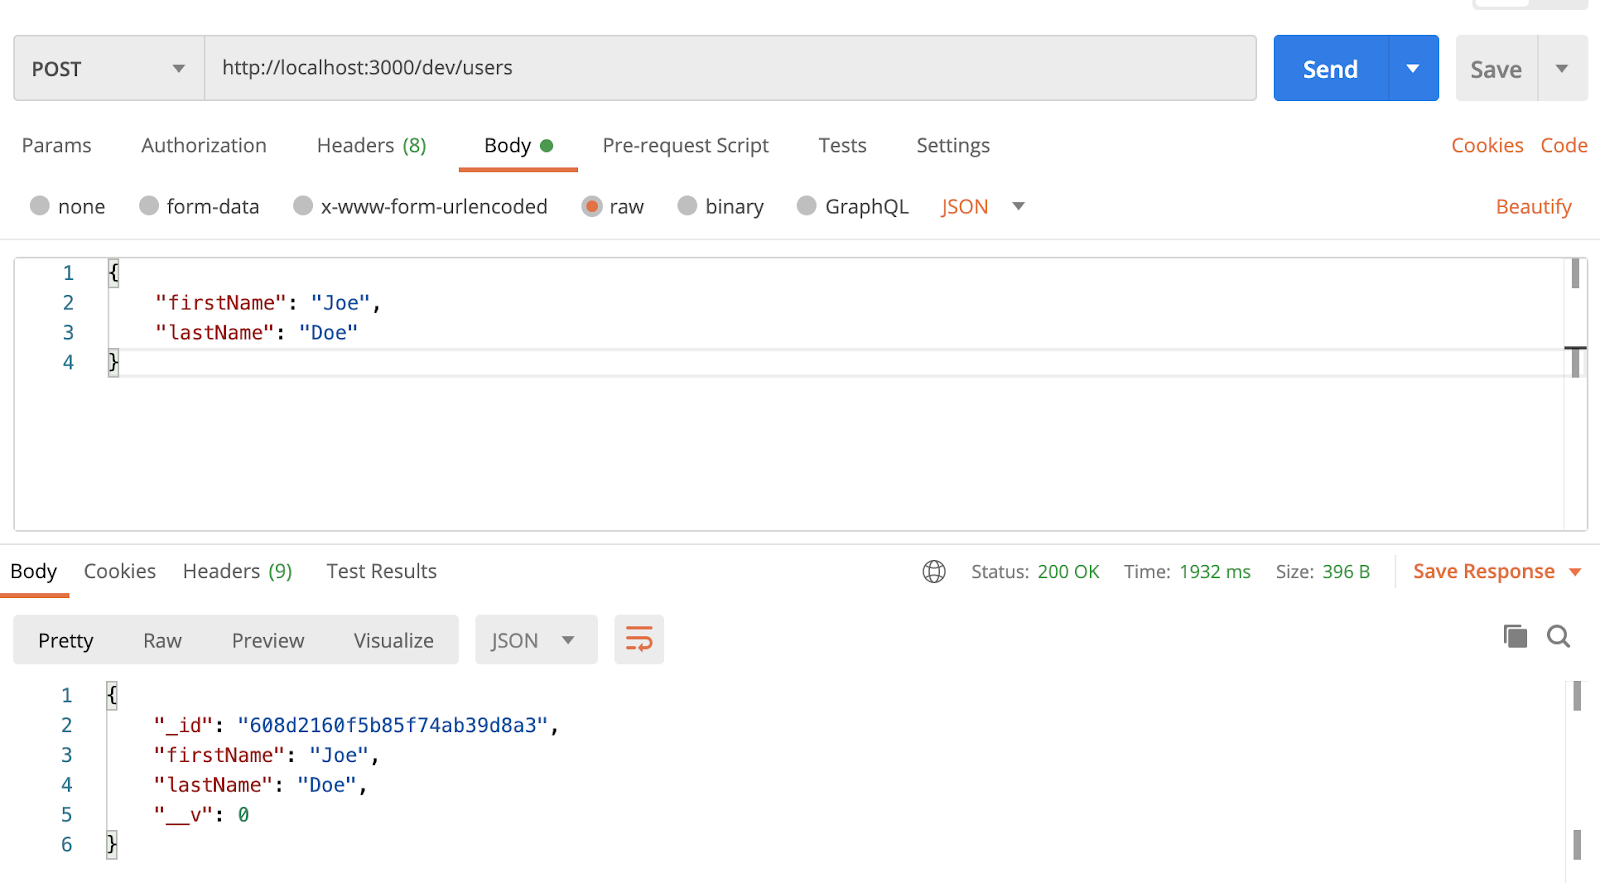
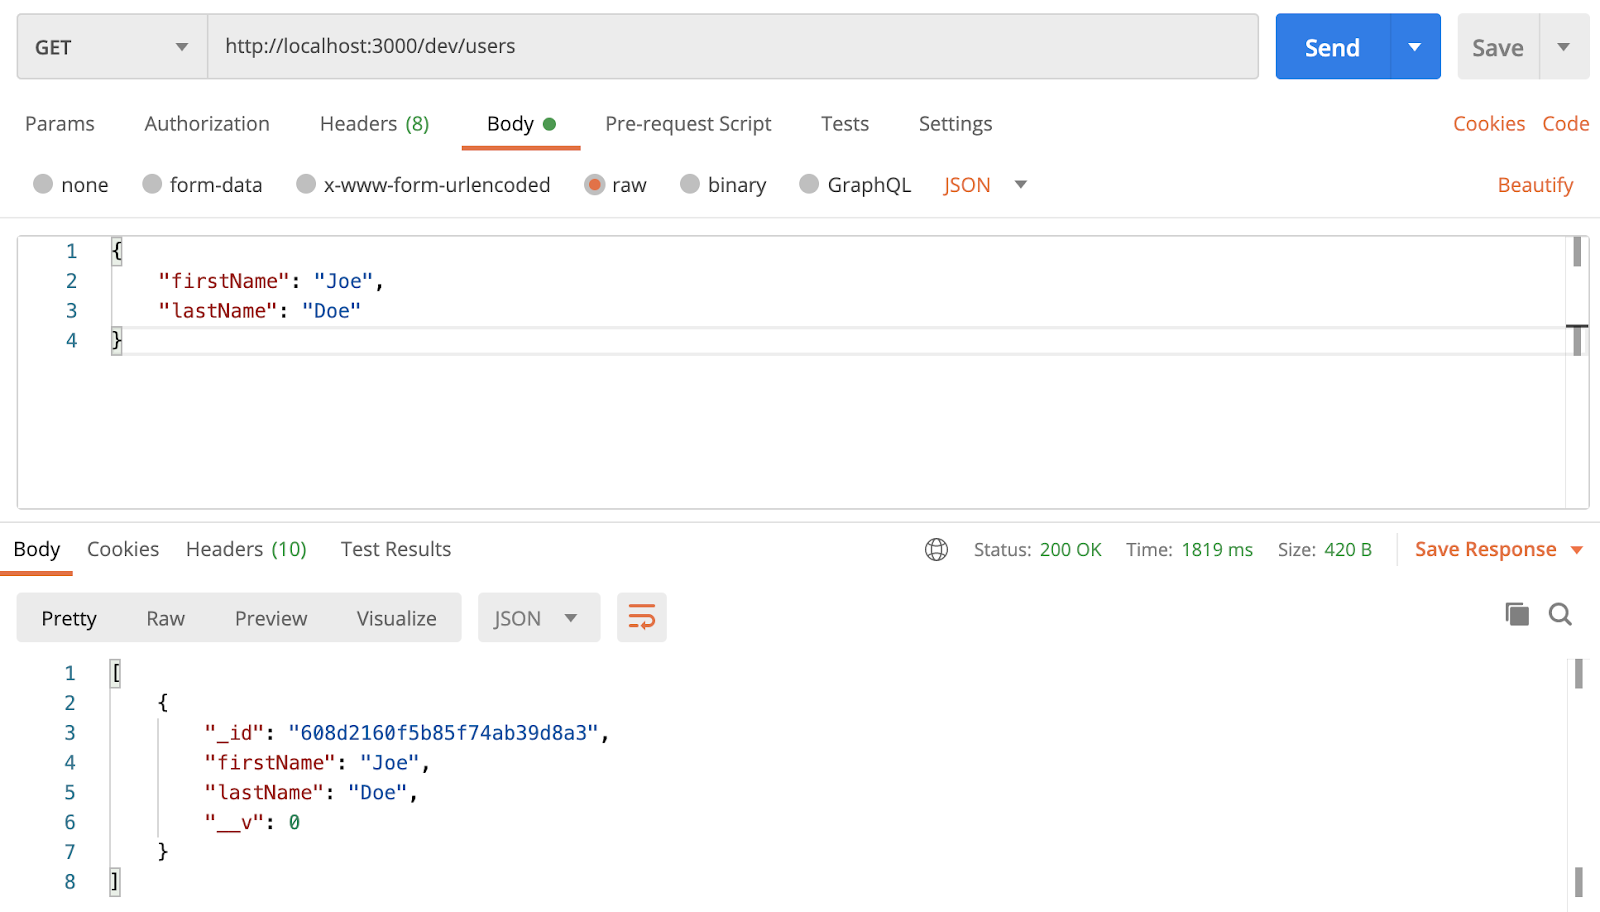
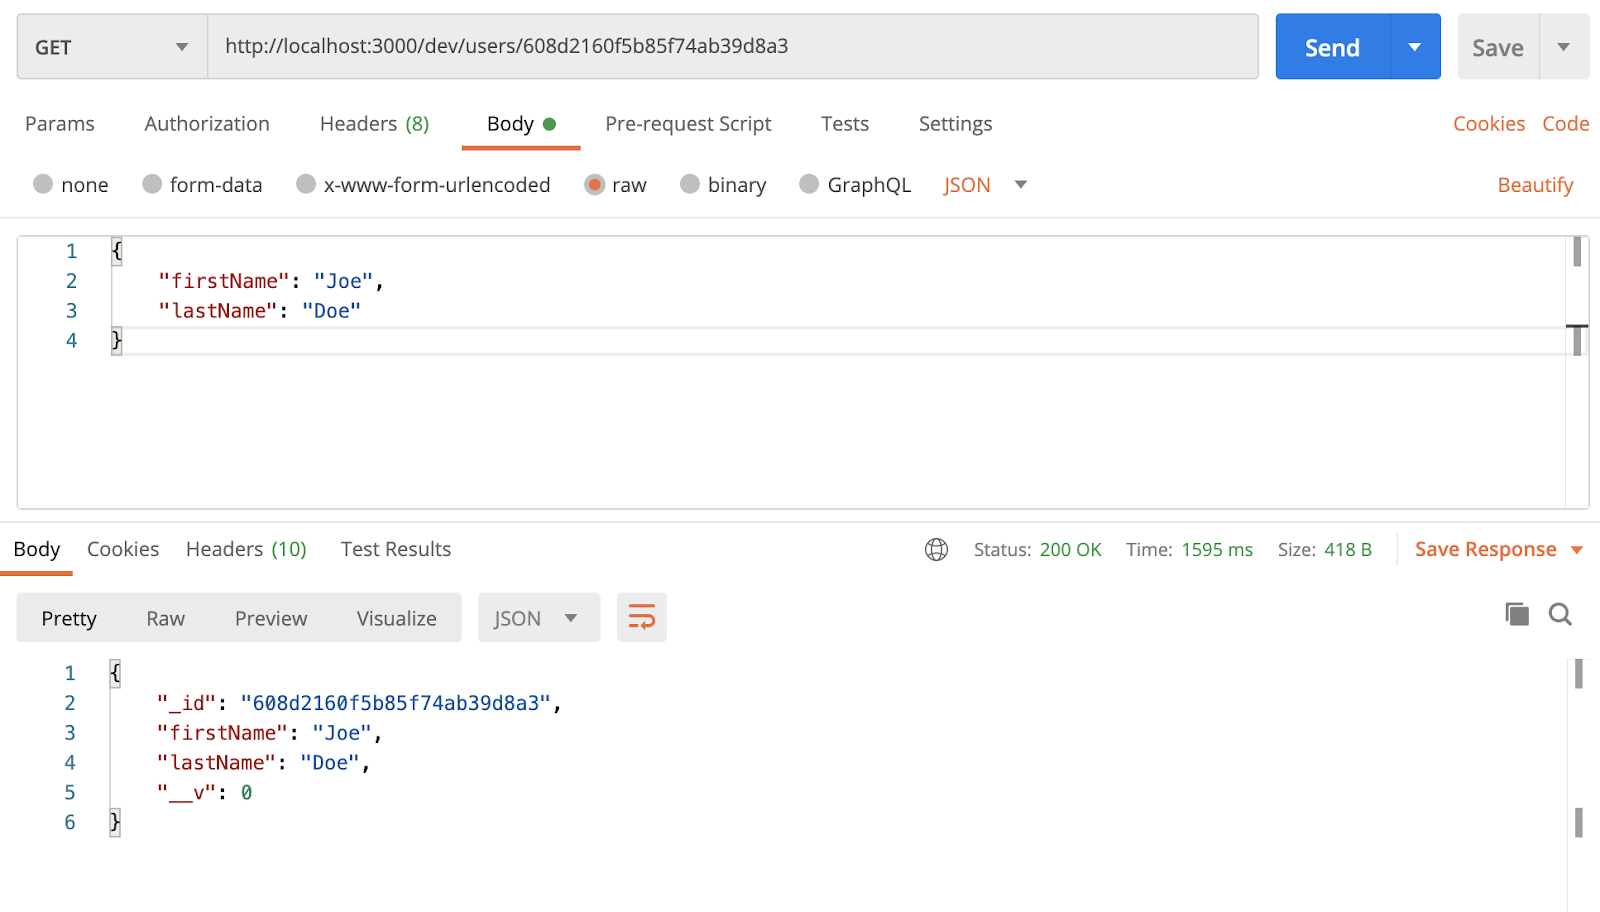
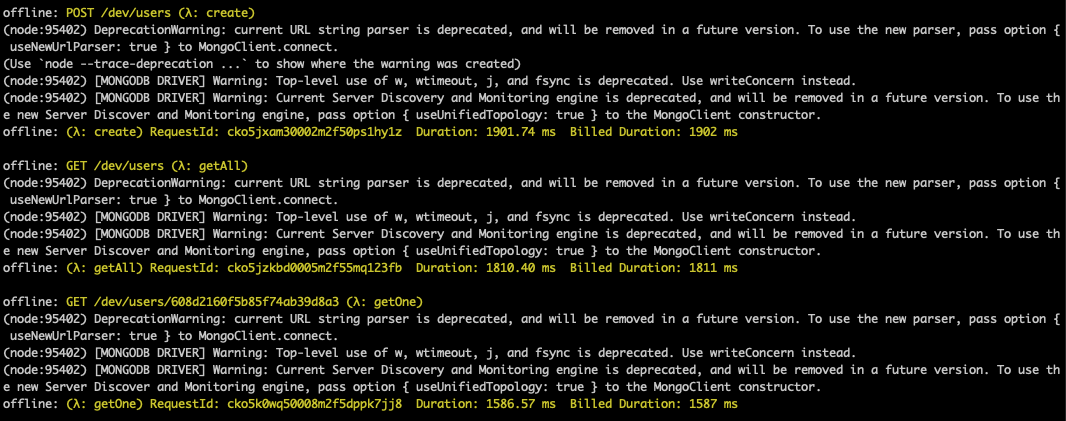
As a result of the requests we make from Postman, we can see the information about the requests on the terminal screen.
Deploying to AWS
Deploy can be performed easily and effortlessly through the serverless framework by running the code below on the terminal.
|
1 2 3 |
sls deploy |
With this command, you can see the following output on your terminal screen indicating that our project has successfully deployed to the AWS environment.
Conclusion
With this article, we examined the concept of serverless, which entered our lives later. We have developed Serverless REST API with Node.js and MongoDB application to embody the information we have acquired. You can minimize your time and costs by designing and developing your applications in accordance with the serverless architecture.
You can access the source code of the project here: Serverless REST API project example with Node.js and MongoDB on GitHub